The following sections explain Matchforce functionalities that are only available to those with Agency Administrator permissions. All instructions on this page require you to be in the Agency Management application. So before we get started, let’s head into the correct application. You can do this by clicking on the App Launcher (![]() ) and selecting Agency Management.
) and selecting Agency Management. 
To make working with your agency settings easier, create a new Account List View named My Agency: Change Filter By Owner to All Accounts, add a filter for Account Record Type equals Agency, and click Save. Now only your agency account will appear under the My Agency List View.
-
Skip ahead
- Create a Site-Based Program
- Edit an Existing Site-Based Program
- Add a New Grant
- Editing an Existing Grant
- Enter a New Referral Detail
- Editing an Existing Referral Detail
- Associate a Grant with an Enrollment
- Associate a Grant with a Match
- Associate a Grant with a Contact
- Create New Local Program
- Editing an Existing Local Program
- System Automation
- Adding a Background Check Message
- Increasing the Number of Required References
- Entering an Online Scheduling System Address
- The Learning Exchange Volunteer Auto Registration
Create a Site-Based Program
Follow these steps to create a new Site-Based Program for your agency:
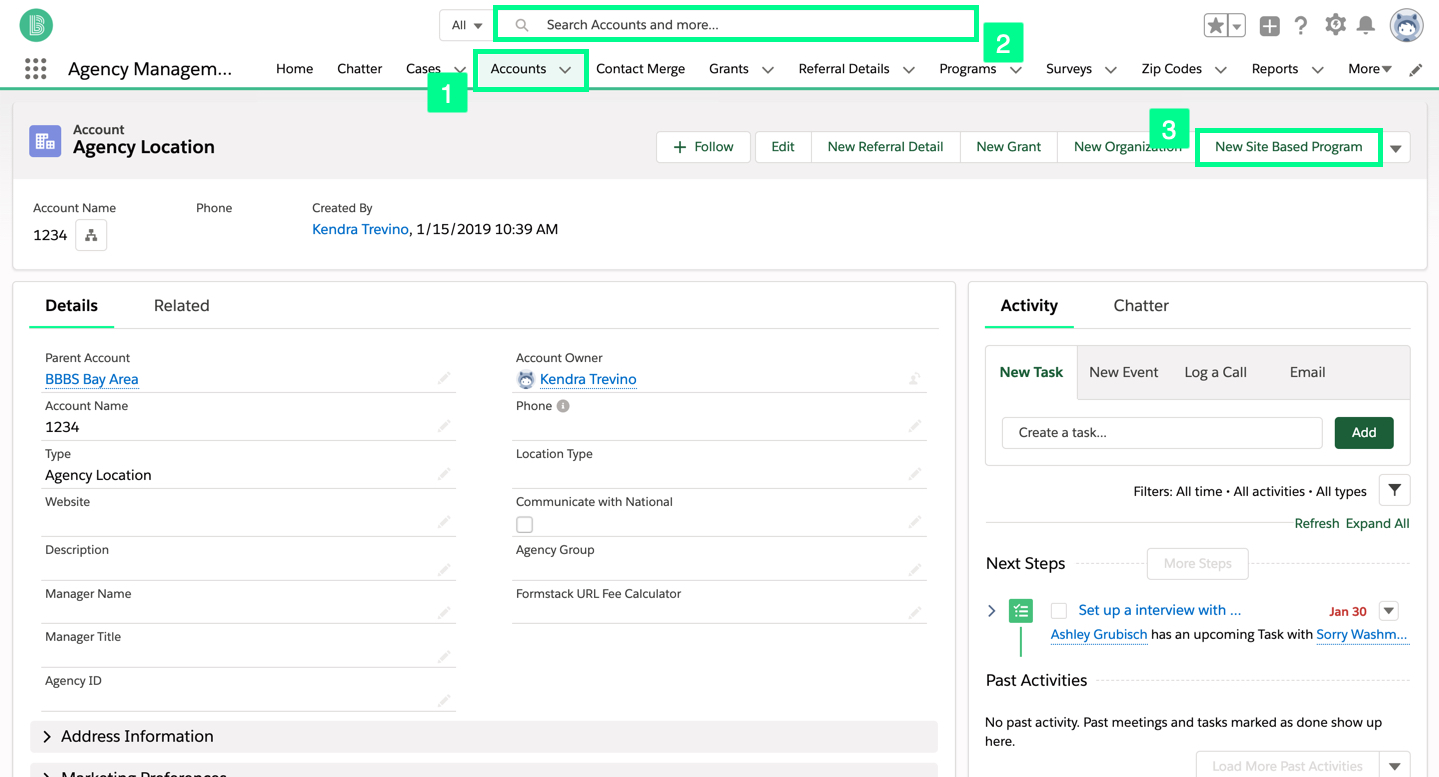
- Click on the Accounts tab.
- Choose your Agency from the List View or enter the name in the Search Accounts and more…box.
- Click New Site Based Program.
- Enter the appropriate information.
- Click Save.
Edit an Existing Site-Based Program
Follow these steps to edit an existing Site-Based Program:
- In the Accounts tab, select an agency.
- Click the Related tab, scroll down to Programs, and find the program you wish to edit.
- Click
 and select Edit.
 - Make the desired changes.
- Click Save.
Grants
Adding a New Grant
Follow these steps to add a New Grant:

- In the Accounts tab, select an agency.
- Choose New Grant from the Agency Navigation Bar.
- Enter the appropriate information.
- Mark the Active check box.
- Click Save.
Editing an Existing Grant
Follow these steps to edit an Existing Grant:
- On the Navigation Bar, click the Grants tab.
- Select the grant you wish to edit from the List View or search for it using the Search Grants and more…box.
- Click and select Edit.
- Make your desired changes.
- Click Save.
Make a Grant inactive by unchecking the Active check box.
Associating Grants
The following video follows the same process for associating a grant with an enrollment, match, or a contact. For detailed instructions, see Associating a Grant with an Enrollment, Associating a Grant with a Match, and Associating a Grant with a Contact below.
Associate a Grant with an Enrollment
Follow these steps to associate a Grant with an Enrollment:
- Open an Enrollment record.
- In the Related List Quick Links, click Grants (#).
- At the top right of the list, click New.
- From the Search Grants field, choose the Grant. This is required.
- Make sure the Enrollment is populated.
- Click Save.
Associate a Grant with a Match
Follow these steps to associate a Grant with Match:
- Open a Match record.
- In the Related List Quick Links, click Grants (#).
- At the top right of the list, click New.
- From the Search Grants field, choose the Grant. This is required.
- Make sure the Match is populated.
- Click Save.
Associate a Grant with a Contact
Follow these steps to associate a Grant with a Contact:
- Open a Contact record.
- In the Related List Quick Links, click Grants (#).
- At the top right of the list, click New.
- From the Search Grants field, choose the Grant. This is required.
- Make sure the Contact is populated.
- Click Save.
You do not need to associate a Grant with Contacts that are associated to the same Enrollments or Matches. Participants related to the Enrollment and Match are automatically associated to the Grant. Using a report type of “Matches” with “Grants” or “Enrollments” with “Grants” will produce a report showing you what Grants are associated with which Contacts by virtue of the Enrollment and Match Grant affiliations
You can tag an Enrollment, Match, and Contact from the same Grant Affiliation by populating those fields.
If you tag an Enrollment, Match, or Contact with a grant more than once, it will show up in your reports multiple times. For the best data quality, only create one Grant Affiliation for each Grant and Match or Enrollment or Contact.
Enter a New Referral Detail
Follow these steps to enter a New Referral Detail:
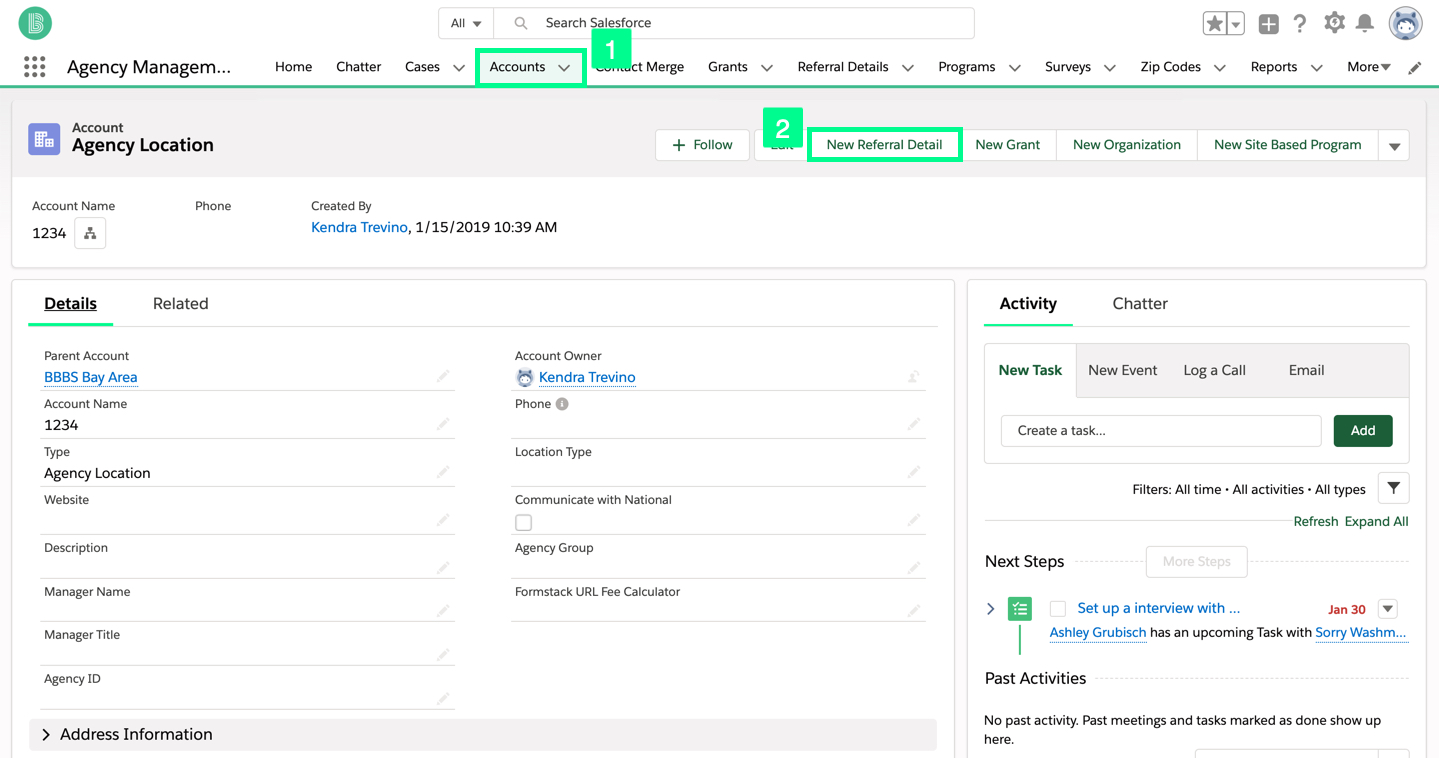
- In the Accounts tab, select an agency.
- In the Agency Navigation Bar, click New Referral Detail.
- Enter the appropriate information, check the Active check box.
- Click Save.
Editing an Existing Referral Detail
Follow these steps to edit an Existing Referral Detail:
- On the Navigation Bar, click the Referral Details tab.
- Select the Referral Detail Record you want to edit from the List View or search for it using the Search Referral Details and more…box.
- Click and select Edit.
- Make your desired changes.
- Click Save.
Make a Referral Detail inactive by unchecking the Active check box.
Create New Local Program
Follow these steps to create a New Local Program:
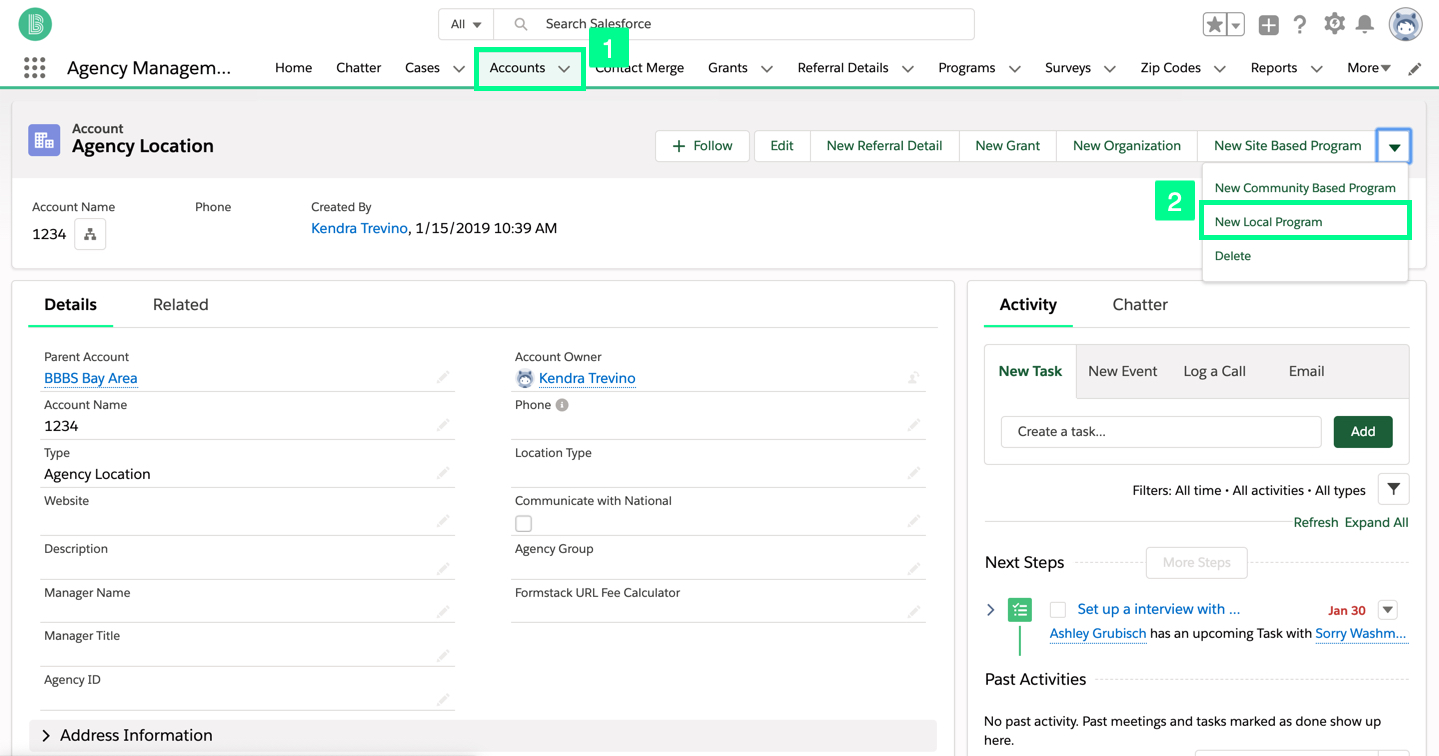
- In the Accounts tab, select an agency.
- Click New Local Program. Depending on your computer, you may need to select to see this option.
- Enter the appropriate information.
- Click Save.
Editing an Existing Local Program
Follow these steps to edit an existing Local Program:
- In the Accounts tab, select an agency.
- Click the Related tab, scroll down to Programs, and find the program you wish to edit.
- Click and select Edit.
- Make the desired changes.
- Click Save.
System Automation
Matchforce automatically creates and sends several emails and surveys associated with BBBS Enrollments and Matches. Here is a list of the automatically generated emails:
- Inquiry Thank You – Web Inquiry Form submitted
- Big Application (Long Form) – Web Inquiry Form submitted without Big Application
- Big Interview Reminder – Two (2) days before Big’s Scheduled Interview
- Big Training Reminder – Two (2) days before Big’s Schedule Training
- Match Introduction Meeting Reminder – Two (2) days before a Scheduled Introduction Meeting
- Enrollment Satisfaction Survey – Upon Match Activation
- Surveys created in accordance with BBBS standards AnnualYOS/COS sent upon creation:
- Match Satisfaction Survey
- Strength of Relationship Survey
- Risk and Protective Inventory
Review examples of all of the automated emails available to be sent by Matchforce.
Turning Off Matchforce Automation
All automated emails coming from Matchforce can be individually turned off at the agency level. Follow these steps to turn off Matchforce automated communications:
- In the Accounts tab, select an agency.
- On the Details tab, scroll down to the Marketing Preferences section.
- Click the pencil icon and uncheck any categories you wish to remove automated emails.
- Click Save.
Adding a Background Check Message
In the Big Enrollments section, Matchforce allows you to create reminders. These reminders are intended to help staff members remember to complete specific background check. Follow these steps to create a customized message:
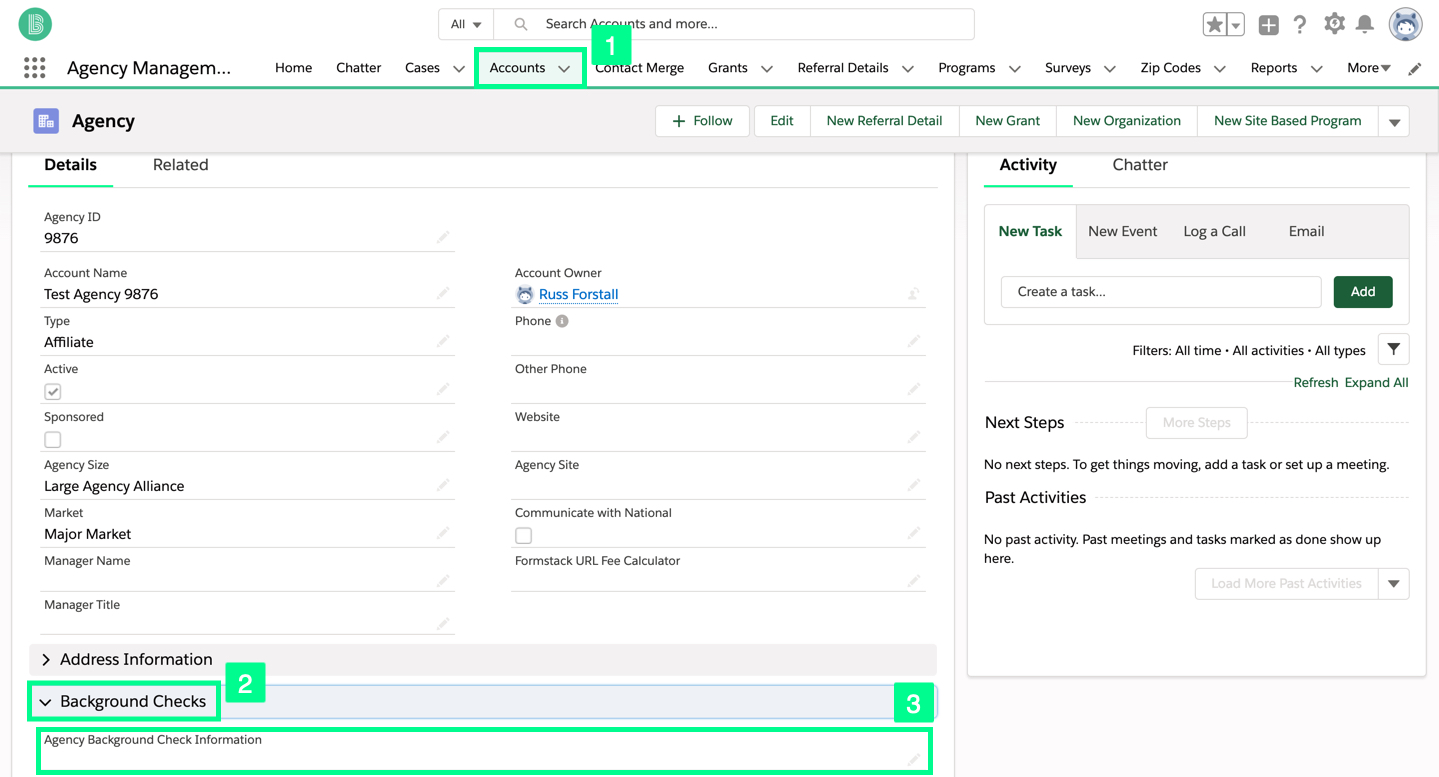
- In the Accounts tab, select an agency.
- On the Details tab, scroll down to Background Checks.
- In the Agency Background Check Information field, click the pencil.
- Enter your custom message.
- Click Save.
Increasing the Number of Required References
With Matchforce, the number of Required References for a Big’s Enrollment Application to advance to Ready to be Matched, can be set to values greater than that required by BBBS standards. Here are the steps to require additional references:
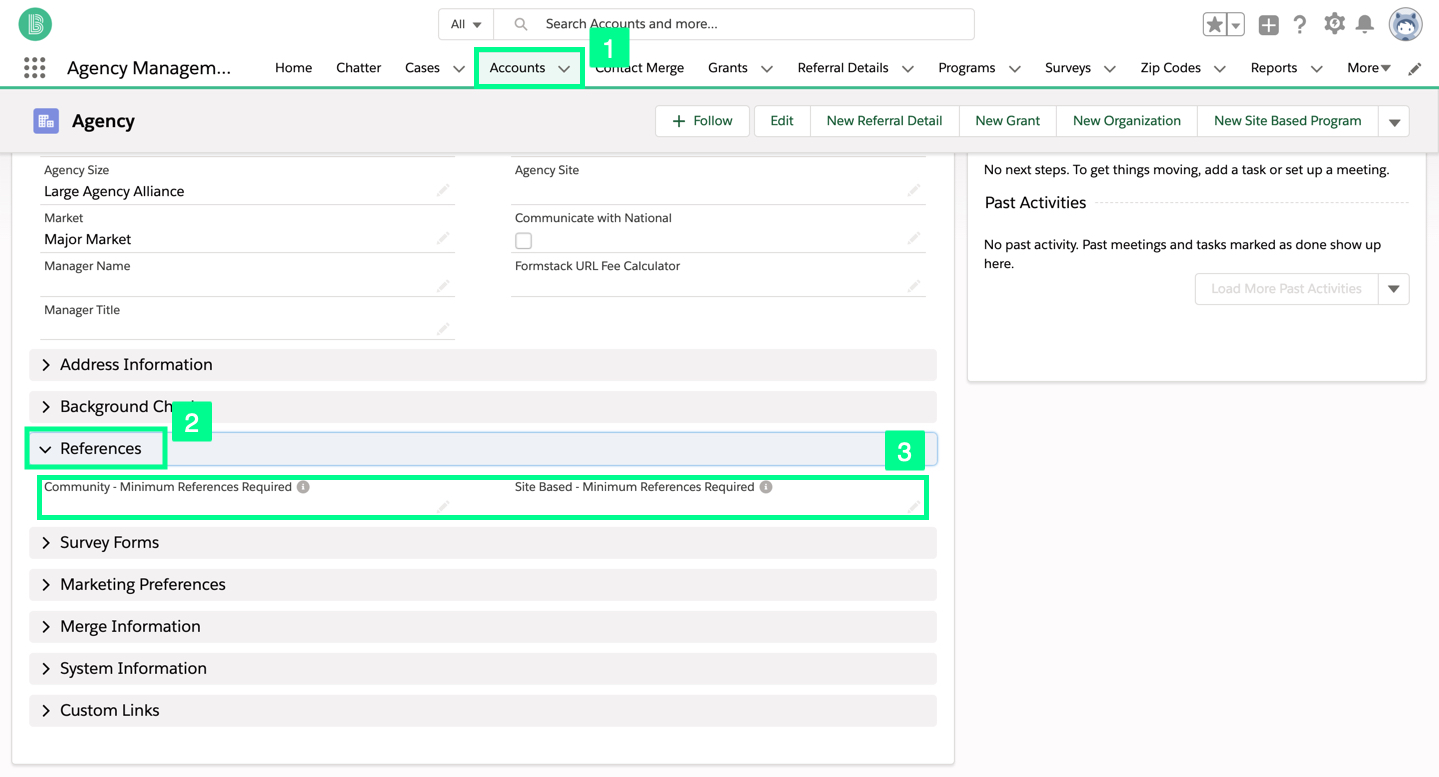
- In the Accounts tab, select an agency.
- In the Details section, scroll to the References section.
- Click a pencil and update the Community and/or Site-Based References Required.
- Click Save.
Entering an Online Scheduling System Address
Matchforce allows you to enter an Acuity Scheduling Link to aid in scheduling Match Support Contacts. See the steps below:
- Click on your profile image or
 if you have not updated it yet.
 - Next to the profile image, click on your name. This opens your Matchforce profile.
- Click Edit to open the dialog box and scroll down to the Acuity Scheduling Link field.
- Enter the address of your online scheduling system.
- Click Save.
Agency Management privileges are not required to complete these steps.
The Learning Exchange Volunteer Auto Registration
To learn more about The Learning Exchange Volunteer Auto Registration, click here.