Are you ready to take your Bigs and Littles to the next level? In this section, we will go over how to create an Enrollment Application using Contact Records. Enrollment Applications can only be created for Contacts already existing within Matchforce.
-
Skip Ahead
- Creating a New Big Enrollment
- Creating a New Little Enrollment
- Enrollment Stages
- Key Fields and Guidance for Success
- Big Enrollment Stages
- Little Enrollment Stages
Creating a New Big Enrollment
In order for a Big contact to move through the matching process, an Enrollment Application needs to be created. Let’s get this Big going with their enrollment shall we:
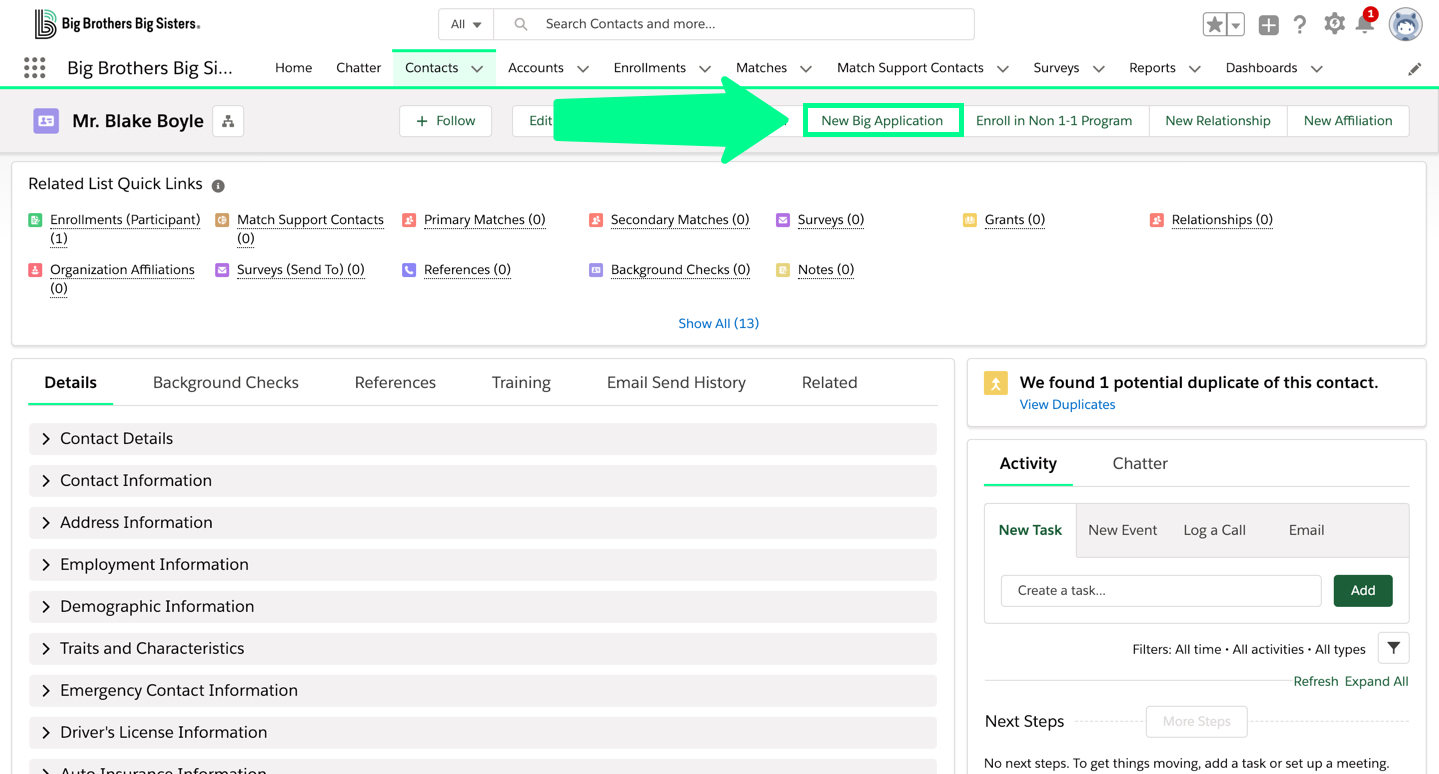
- Open the Big Contact Record.
- Click
 .
. - In the New Big Application dialog box, select the Big’s Program Type Preference. More than one preference can be added.
- Click
 to move these preferences to Chosen.
 - Click Save.
The Big’s Enrollment Application can now be seen on the Enrollments tab.
If the Contact entered Matchforce through a Web Form, both a Contact Record and an Enrollment Record were automatically generated.
Creating a New Little Enrollment
We can’t forget about the Littles! This next section may look familiar, but we will pass through it quickly:
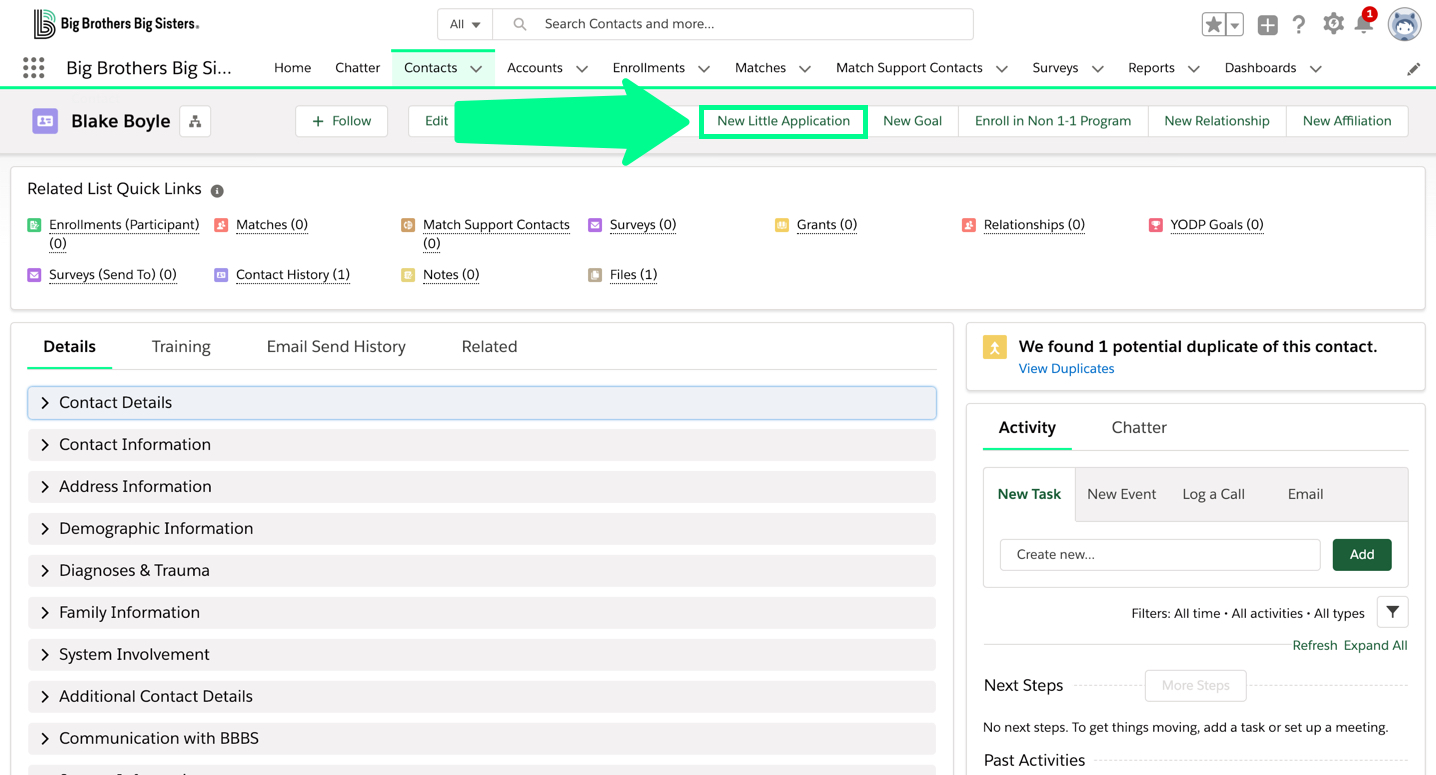
- Open the Little Contact Record.
- Click
 .
. - In the New Little Application dialog box, select the Little’s Program Type Preference. More than one preference can be added.
- Click to move these preferences to Chosen.
- Click Save.
The Little’s Enrollment Application can now be seen on the Enrollments tab.
If the contact entered Matchforce through a Web Form, both a Contact Record and an Enrollment Application Record were automatically generated.
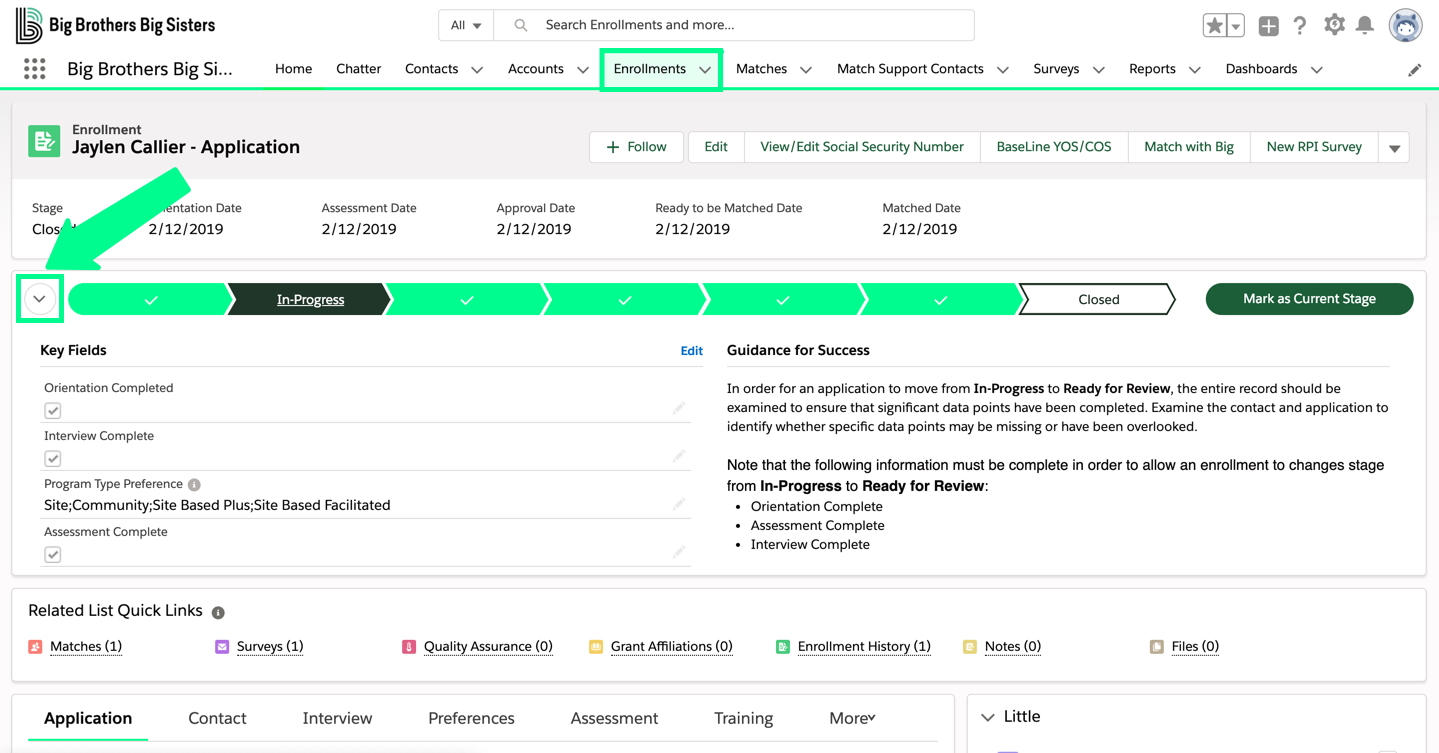
Enrollment Stages
In Matchforce, there are seven Enrollment Stages. Each stage has certain requirements that must be met in order to move a Big, Little, or Match on to the next phase.
The stages are New, In-Progress, Ready for Review, Ready to be Matched, Pending Match, Matched, and Closed. You will see these stages as an Enrollment Progress Bar at the top of every Enrollment page.

Key Fields and Guidance for Success
The Enrollment Progress Bar does more than point you to a Closed Match. It is interactive and provides you with the guidance you need to handle each step of the matching process.
By clicking ![]() , you will see two sections, Key Fields and Guidance for Success. Key Fields is your checklist. These are the tasks to be completed before pushing the Match to the next phase. Guidance for Success contains notes that will help guide you smoothly through the Matching process.
, you will see two sections, Key Fields and Guidance for Success. Key Fields is your checklist. These are the tasks to be completed before pushing the Match to the next phase. Guidance for Success contains notes that will help guide you smoothly through the Matching process.
Big Enrollments
In the next few sections, we will be walking through the steps of Big Enrollment. For these sections, we will be staying within the Big’s Enrollment tab within Matchforce.
New | In-Progress
We have no Matchforce requirements to complete in this section. We can move this Big straight to In-Progress:
- In the Big’s Enrollment Application, click In-Progress on the Enrollment Progress Bar.
- Click
 .
. - The Enrollment Progress Bar is now updated to show the current stage:

In-Progress | Ready For Review
In order to move a Big to be Ready for Review, the following activities must be completed:
- Program Type Preference must be selected
- The necessary number and type of reference and background checks
- Orientation
- Interview
- Assessment
Please review Standard 16 for more information on specific program requirements.
These are listed under In-Progress beneath Guidance for Success.
Selecting Program Type Preference
Let’s keep this ball rolling with Program Type Preference:
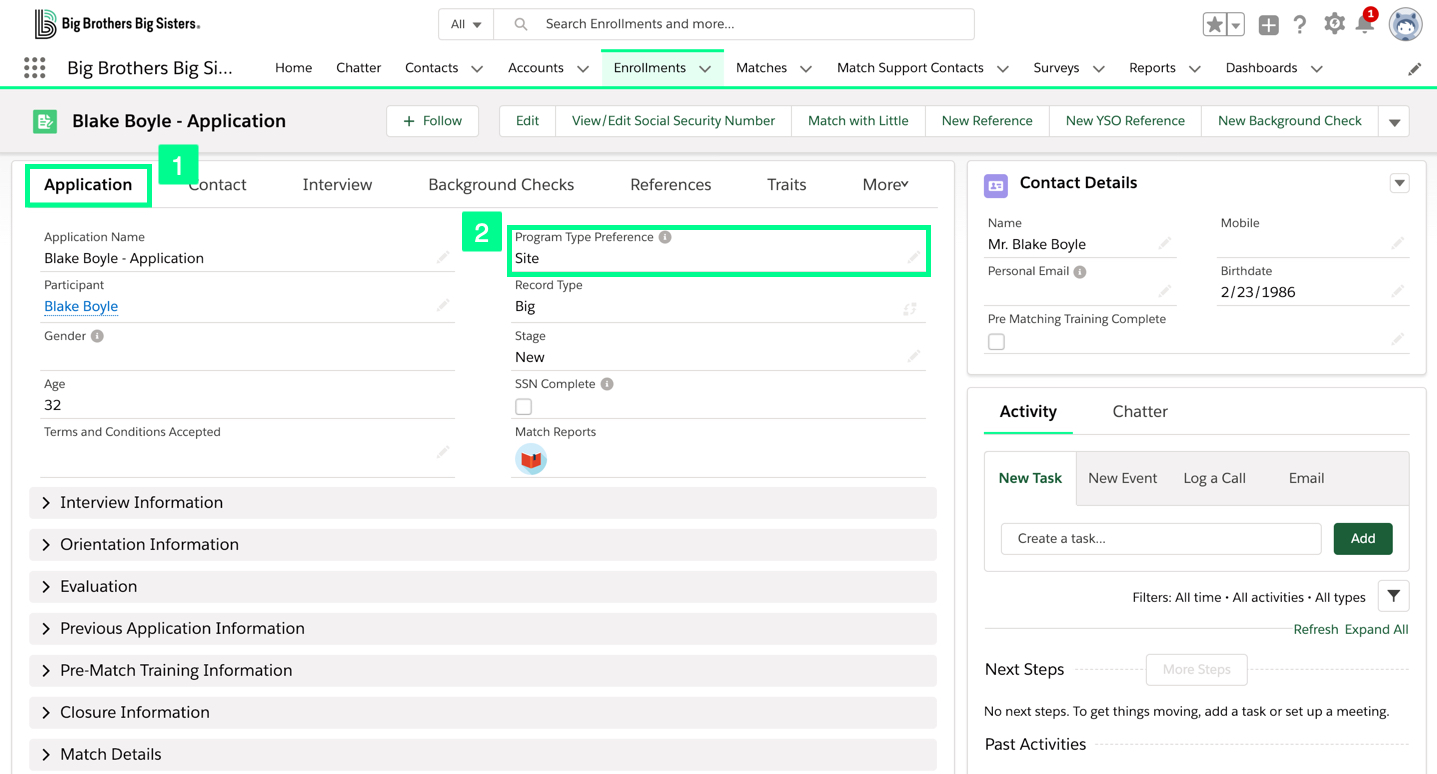
- In the Big’s Enrollment, scroll down to the Application tab which is near the left-hand side.
- In the field Program Type Preference, click the pencil.
- Select the Program Type Preference from the Available box, click to move it to Chosen.
- Click Save.
Entering and Editing Reference Checks
Staying in the Big’s Enrollment, let’s move on to Reference Checks:
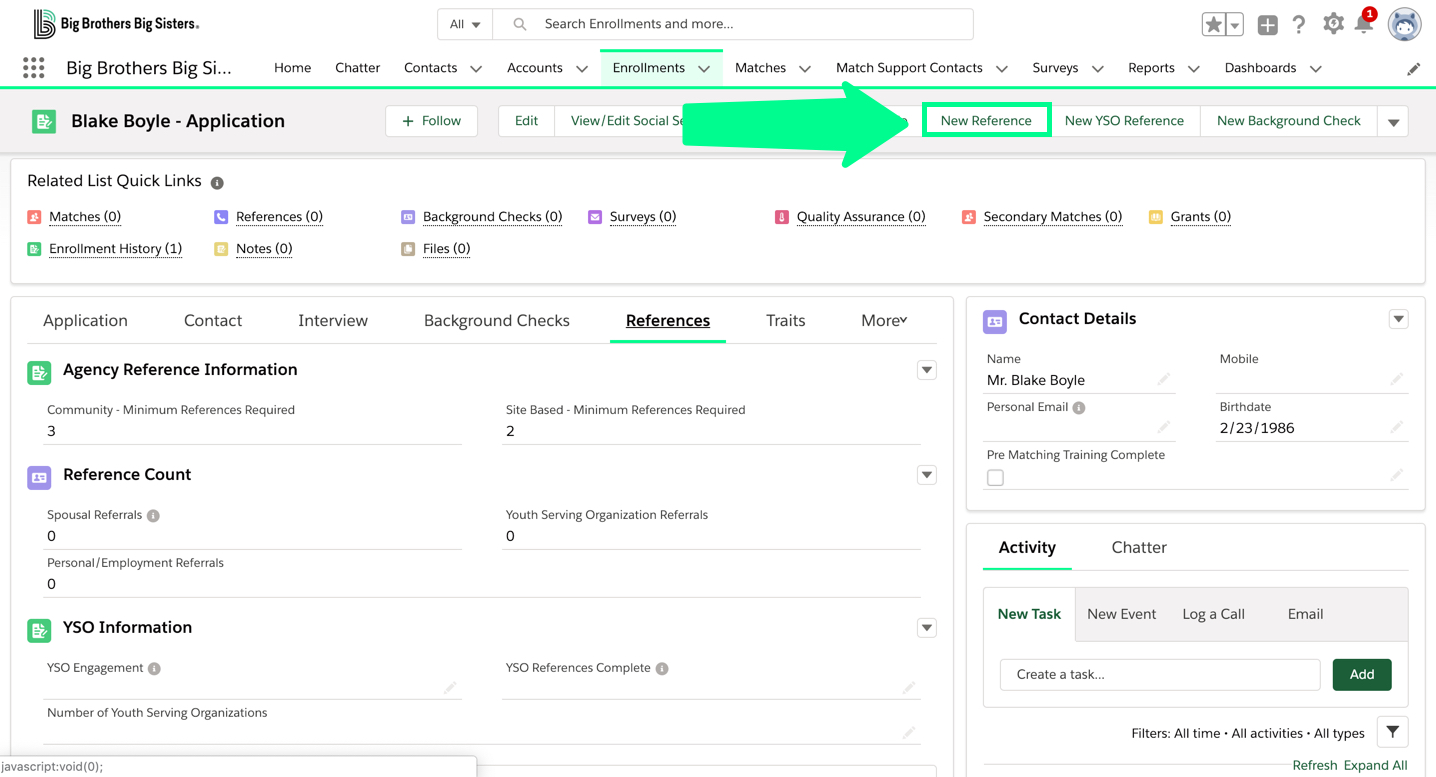
- On Big Enrollment’s navigation bar, click New Reference.
- Enter all information for the reference.
- Select a Status from the dropdown list (‘Meets Criteria’ indicates a reference is complete and acceptable).
- If needed, enter information in the Comments field.
- Click Save.
Here is how you can edit a Big’s reference:
- Navigate to the References tab.
- Click the Reference Number for the reference to open.
- To make changes, click the pencil icon in any field.
- Click Save.
Completing Background Checks
Matchforce considers background checks complete when a received date is entered in the system. Please review Standard 16 for more information on specific program requirements. Follow these steps to enter background check received dates:
- Navigate to the Background Checks tab.
- Choose the Received field you wish to update and click the pencil.
- Click
 and choose the received date.
 - Click Save.
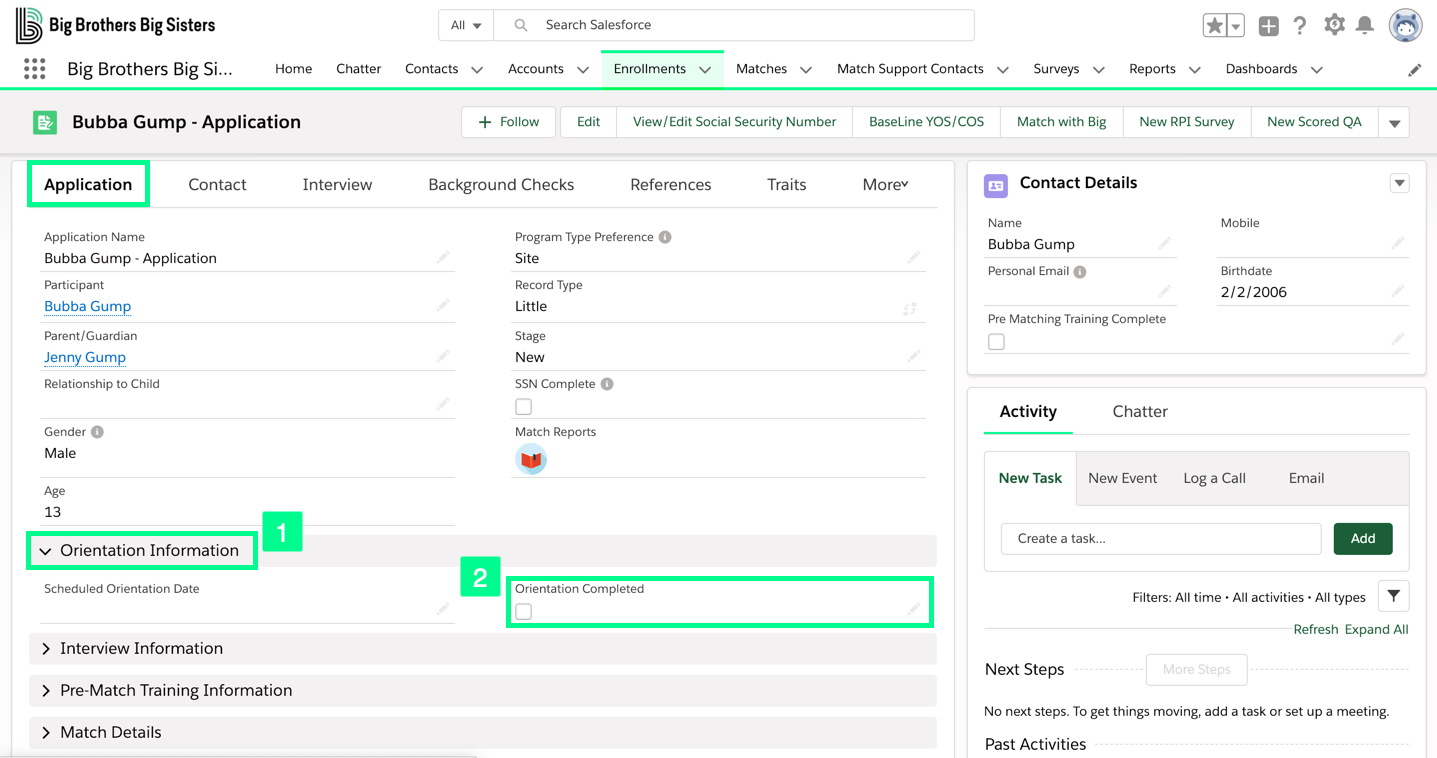
Completing Orientation
In Matchforce, orientation is complete when the check box has been marked. Here is how you do it:
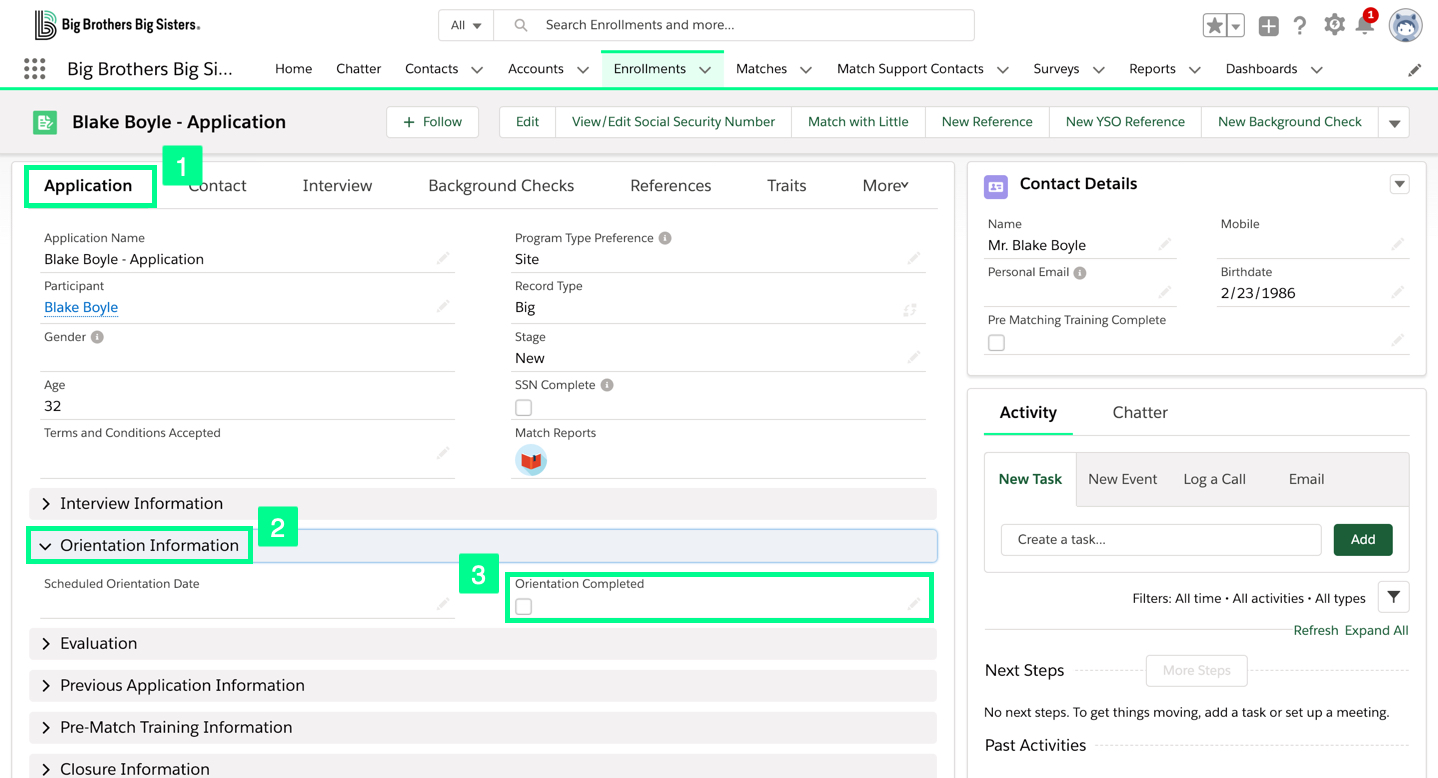
- Under the Application tab, scroll to Orientation Information.
- Beneath Orientation Completed, click the pencil.
- Mark the check box in the Orientation Completed field.
- Click Save.
Though it is not required, you can also enter a Scheduled Orientation Date.
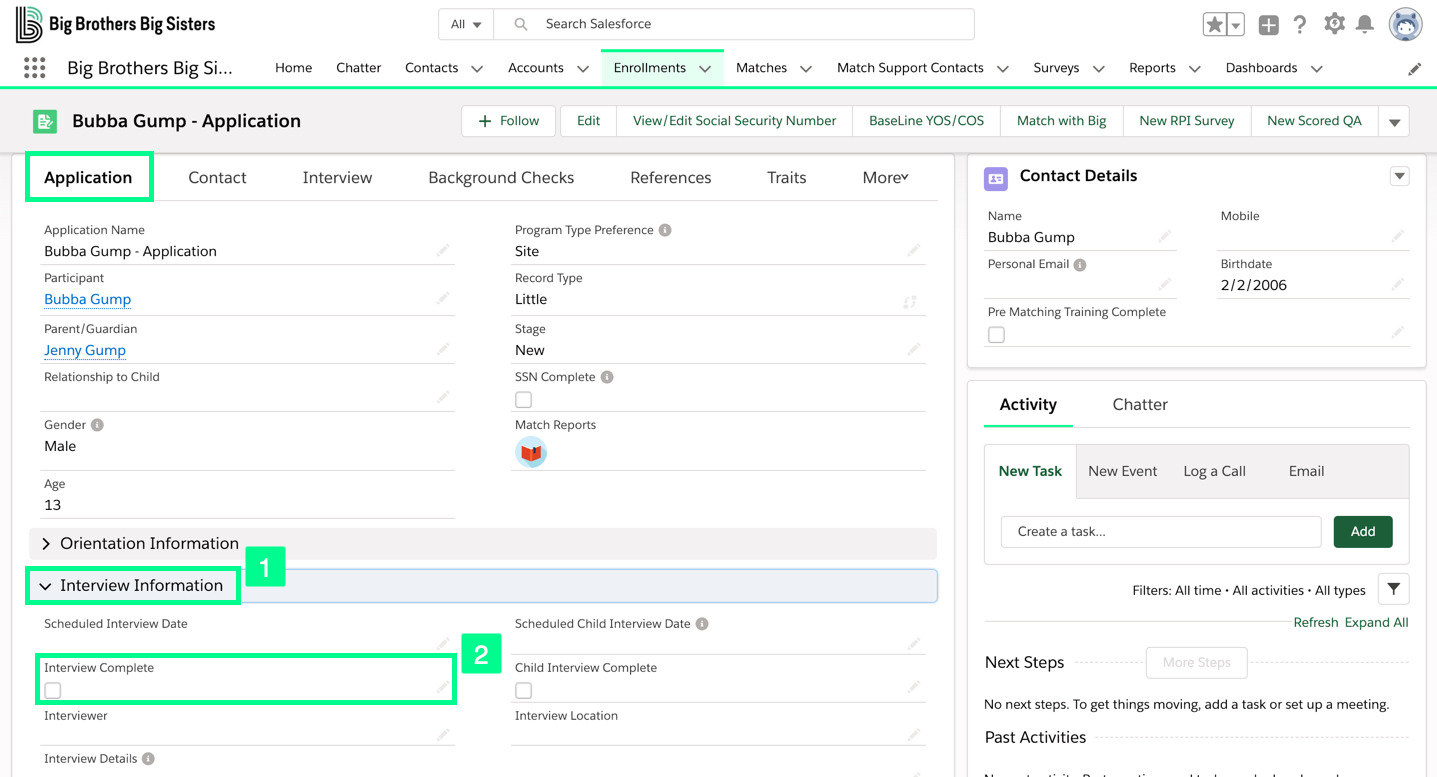
Completing Interview
Have you wrapped up an interview? Let’s walk through updating it in Matchforce:
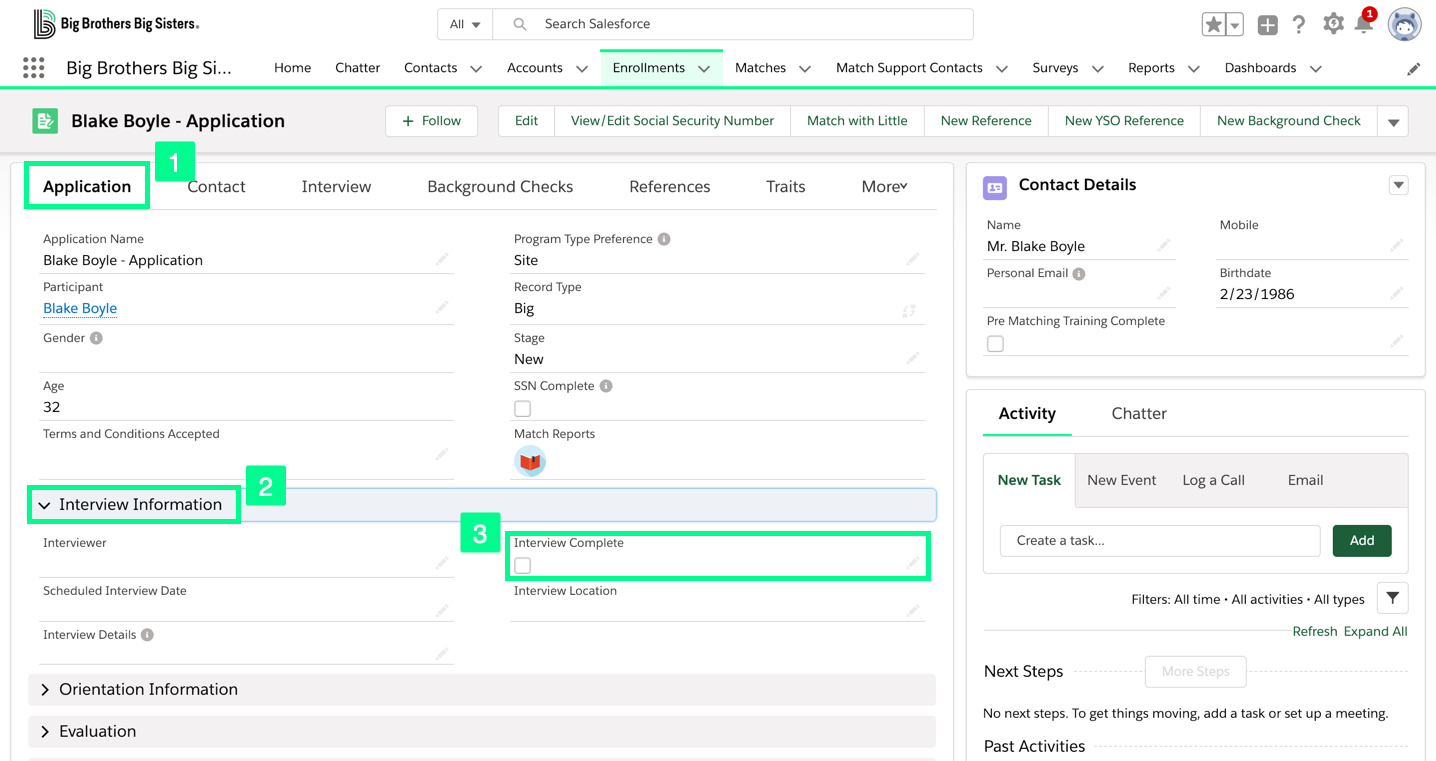
- Beneath the Application tab, scroll to Interview Information.
- In the Interview Complete field, click the pencil.
- Mark the check box under Interview Complete.
- Click Save.
Matchforce provides space for the Interviewer, Scheduled Interview Date, Location and Details, but none are required to proceed.
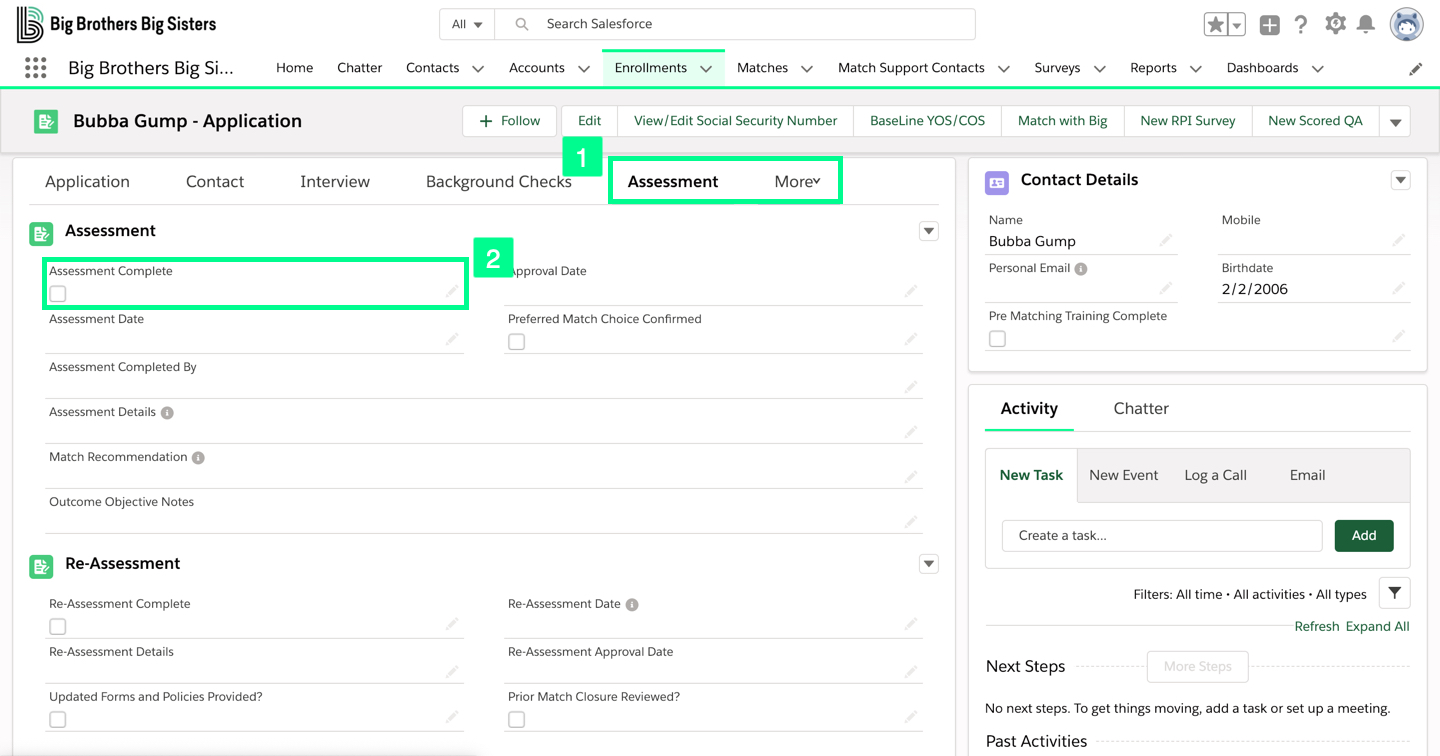
Completing Assessment
Follow these steps to mark an Assessment as complete:

- Navigate to the tab labeled Assessment. Depending on your computer, it may appear beneath
 .
. - In the Assessment Complete field, click the pencil.
- Mark the check box.
- Click Save.
Matchforce provides additional fields regarding the Assessment, however, this information is not required to continue the matching process.
Moving to Ready for Review
Now that we have successfully completed all of the required activities above, the Big is now Ready for Review. We can move them forward within Matchforce:
- Click the Ready for Review stage on the Enrollment Progress Bar.
- Click
 .
. - The Enrollment Progress Bar is now updated to show the current stage:

Ready for Review | Ready to be Matched
Now the Big is Ready to be Matched. You may not have the system privileges to complete this step. These privileges vary agency to agency and you may need to contact your supervisor to perform this next step. Chatter is a great way to contact them!
Follow these steps to move a Big to Ready to be Matched:
- On the Enrollment Progress Bar, click Ready to be Matched.
- Click .
- The Enrollment Progress Bar is now updated to show the current stage:

Matchforce doesn’t require additional steps, outside of the special privileges needed to move a Big to Ready to be Matched.
Little Enrollment Stages
In the following sections, we will explain how to move a Little through the Enrollment process within Matchforce. We will be staying in the Little’s Enrollment tab.
New | In-Progress
To transfer a Little Enrollment to be In-Progress, we must specify a Guardian.
Follow these steps to specify a parent or guardian via a Little’s enrollment:
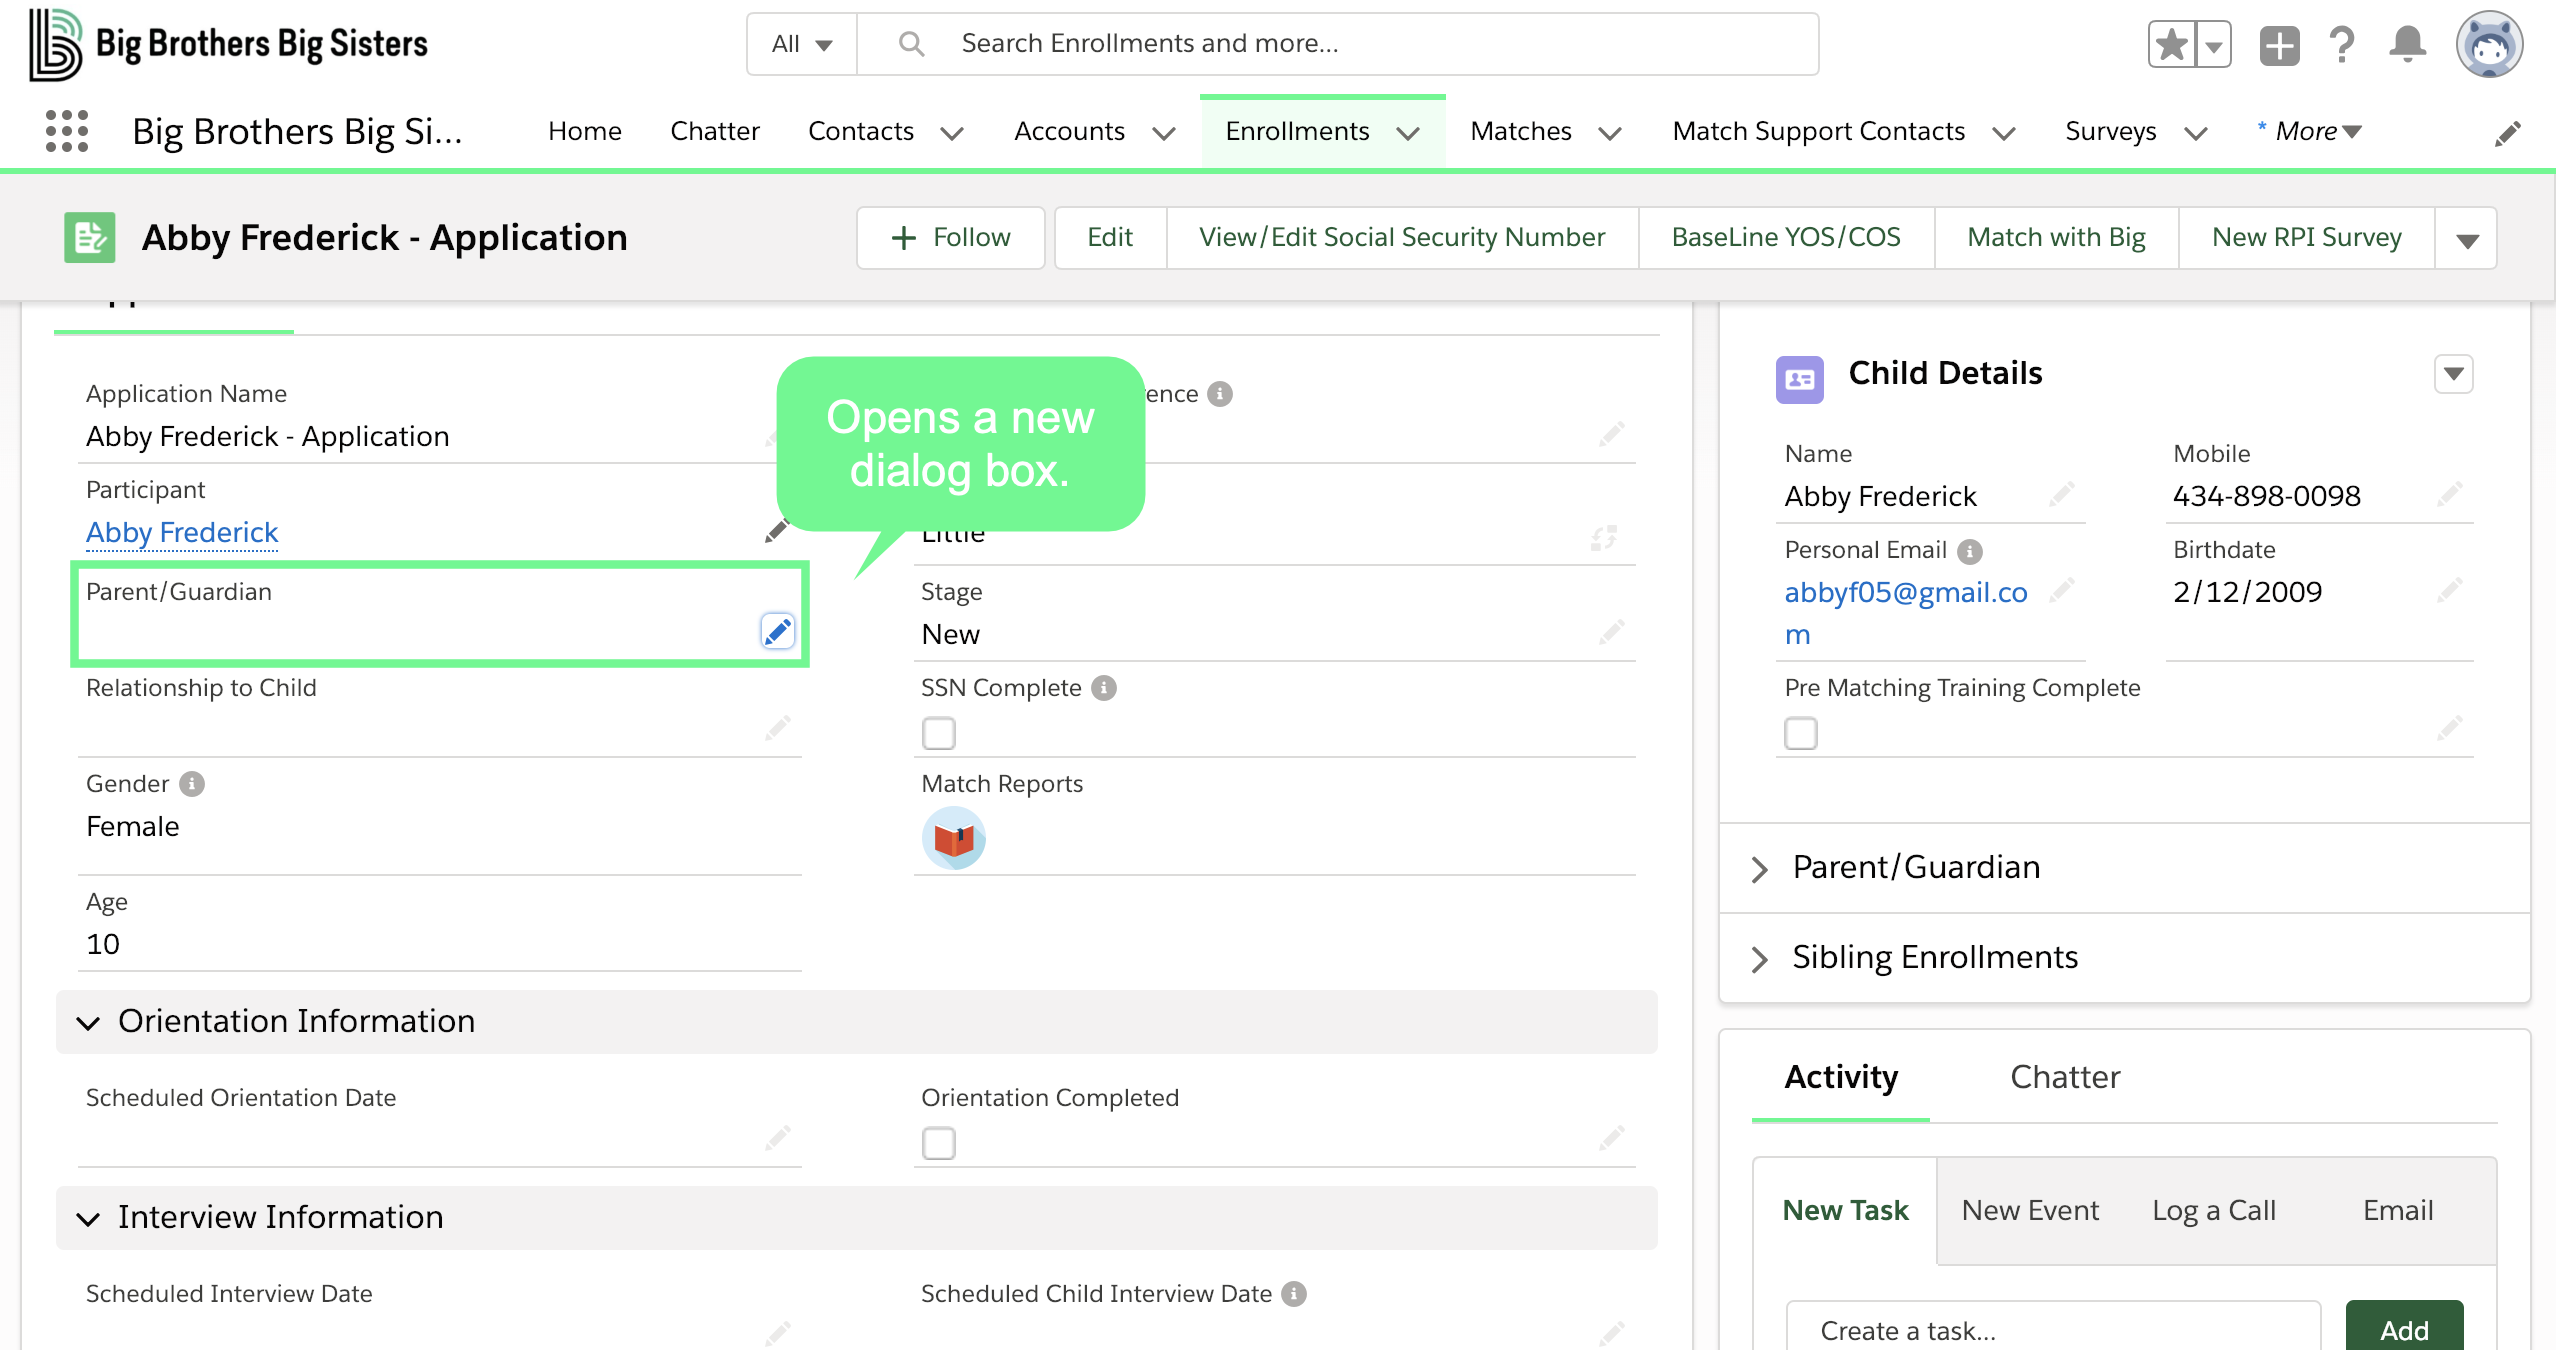
- In the Little’s Application tab, beneath Parent/Guardian, click the pencil.
- You can search by entering their name into Search Contacts…. Select the contact.
- Click Save.
If the Parent/Guardian is not in Matchforce, a new Contact will need to be entered into the system before it can be associated with the Little.
We are now ready to move this Little to In-Progress and here is how it is done:
- On the Enrollment Progress Bar, click In-Progress.
- Click .
- The Enrollment Progress Bar is now updated to show the current stage:
In-Progress | Ready for Review
In order for a Little to be moved from In-Progress to Ready for Review, the following activities must be completed:
- Orientation
- Assessment
- Interview
These are listed under In-Progress beneath Guidance for Success.
Completing Orientation
You have completed the Little’s orientation and now you need to mark it as complete in Matchforce. This is how we do it:
- Under the Application tab, scroll to Orientation Information.
- Beneath Orientation Completed, click the pencil.
- Mark the check box in the Orientation Completed field.
- Click Save.
Though it is not required, you can also enter a Scheduled Orientation Date.
Completing Interview
Have you finished a Guardian interview? Follow the steps below to mark it as complete:
- Beneath the Application tab, scroll to Interview Information.
- In the Interview Complete field, click the pencil.
- Mark the check box under Interview Complete.
- Click Save.
Matchforce provides space for the Interviewer, Scheduled Interview Date, Location and Details, but none are required to proceed.
Completing Assessment
Follow these steps to mark an Assessment as complete:
- Navigate to the tab labeled Assessment. Depending on your computer, it may appear beneath .
- Click the pencil.
- In the Assessment Complete field, mark the check box.
- Click Save.
Matchforce provides additional fields regarding the Assessment, however, this information is not required to continue the matching process.
Moving to Ready for Review
Now that we have successfully completed all of the required activities above, the Little is now Ready for Review. We can move them forward within Matchforce:
- Click the Ready for Review stage on the Enrollment Progress Bar.
- Click .
- The Enrollment Progress Bar is now updated to show the current stage:
Ready for Review | Ready to be Matched
Now the Little is Ready to be Matched. You may not have the system privileges to complete this step. These privileges vary agency to agency and you may need to contact your supervisor to perform this next step. Chatter is a great way to contact them!
Follow these steps to move a Little to Ready to be Matched:
- On the Enrollment Progress Bar, click Ready to be Matched.
- Click .
- The Enrollment Progress Bar is now updated to show the current stage:
Matchforce doesn’t require additional steps, outside of the special privileges needed, to move a Little to Ready to be Matched.