-
Skip Ahead
- Creating a Pending Match
- Moving a Match from Pending to Active
- Navigating to Matches
- Completing a Pre-Match Training
- Completing a Match Approval
- Completing a Match Meeting
- Setting a Site Based Match
- Generating a Baseline YOS/COS
- Completing a Baseline YOS/COS
- Survey Timing
- Documenting Rationale for Match
- Moving a Match to Not Approved
- Changing a Match from one Program Type to Another
- Closing a Pending Match
- Creating a New Couples Match
- Adding a Secondary Big to an Existing Match
Once a Big and Little have completed all the steps in the interview and screening process and are Ready to be Matched (RTBM), a pending match can be created within Matchforce.
Creating a Pending Match
In Matchforce, you can move a Big and Little to the Pending Match phase from either enrollment page.
- From either the Big or Little enrollment pages, in the upper right-hand corner click the Match with Big (Little) button.
- In the dialog box, type in or select the desired program from the Program dropdown list.
- Search and select the appropriate Big or Little application in the Search
Enrollments… box. - Click Save.
Once the steps above are complete, both the Big’s and the Little’s enrollment will show in the Pending Match stage.
![]()
Pending | Active
In order to move a Match to Active, the following activities must be completed:
- All parties must go through Pre-Match Training
- The appropriate parties must approve the match
- A Match Meeting must be completed
- A site must be specified for Site-Based Matches
- A Baseline YOS/COS must be completed
- A Match Rationale must be entered
Navigating to Matches
After a match becomes pending, data entry within Matchforce switches from the Enrollments tab to the Matches tab. In the Navigation Bar along the top of the screen, you will see the tab for Matches. Once you are in the Matches tab, you can use the search box to find any Matches you need.

Completing a Pre-Match Training
After finishing a Pre-Match Training, enter the data into Matchforce. Here is how you can mark a Pre-Match Training as complete:
- In the Navigation Bar, tap on the Matches tab, click on the Match Record you wish to update.
- Locate the Training Information Blocks along the right-hand side of the screen.
- Click
 for the desired Pre-Match Training to mark complete.
 - Below the Pre-Matching Training Complete field, click the pencil icon.
- Select the Pre-Matching Training Complete check box.
- Click Save.
- As necessary, complete these steps for all match participants.
Matchforce includes sections for Training Type and Training notes, but, these fields are not required for the match to progress to Active.
Completing a Match Approval
Matchforce considers Match Approval complete when the appropriate box has been checked. Follow these steps:
- On the General tab of the Match Record, scroll down to the Pre-Match Presentation section.
- In the Pre-Match Presentation section, locate the approval check box you need to update.
- Click the pencil icon and select the check box.
- Click Save.
- Follow these steps for all match participants required to approve the match.
Matchforce provides fields for Comments on each participant’s match approval. However, these fields are not required for the match to progress to Active.
Completing a Match Meeting
Once a Match Meeting is finished, you can mark it as complete in Matchforce:
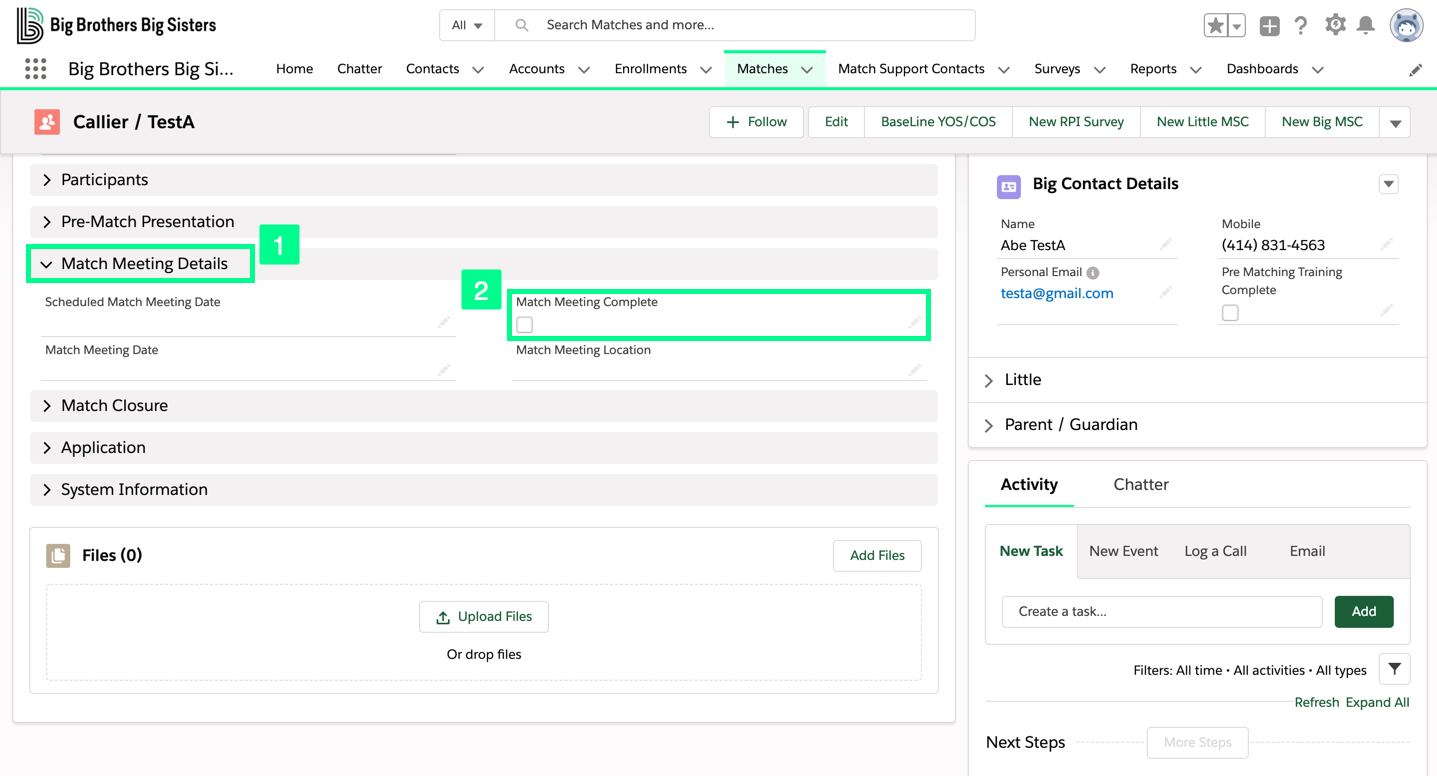
- In Match Record, on the General tab, scroll to Match Meeting Details.
- In the Match Meeting Complete section, click the pencil.
- Mark the Match Meeting Complete check box.
- Click Save.
Matchforce provides space for Scheduled Match Meeting Date, Match Meeting Date, and Match Meeting Location. These fields are not required for the match to progress to Active.
Setting a Site-Based Match Site
Follow these steps to set a site for Site-Based mentoring matches:
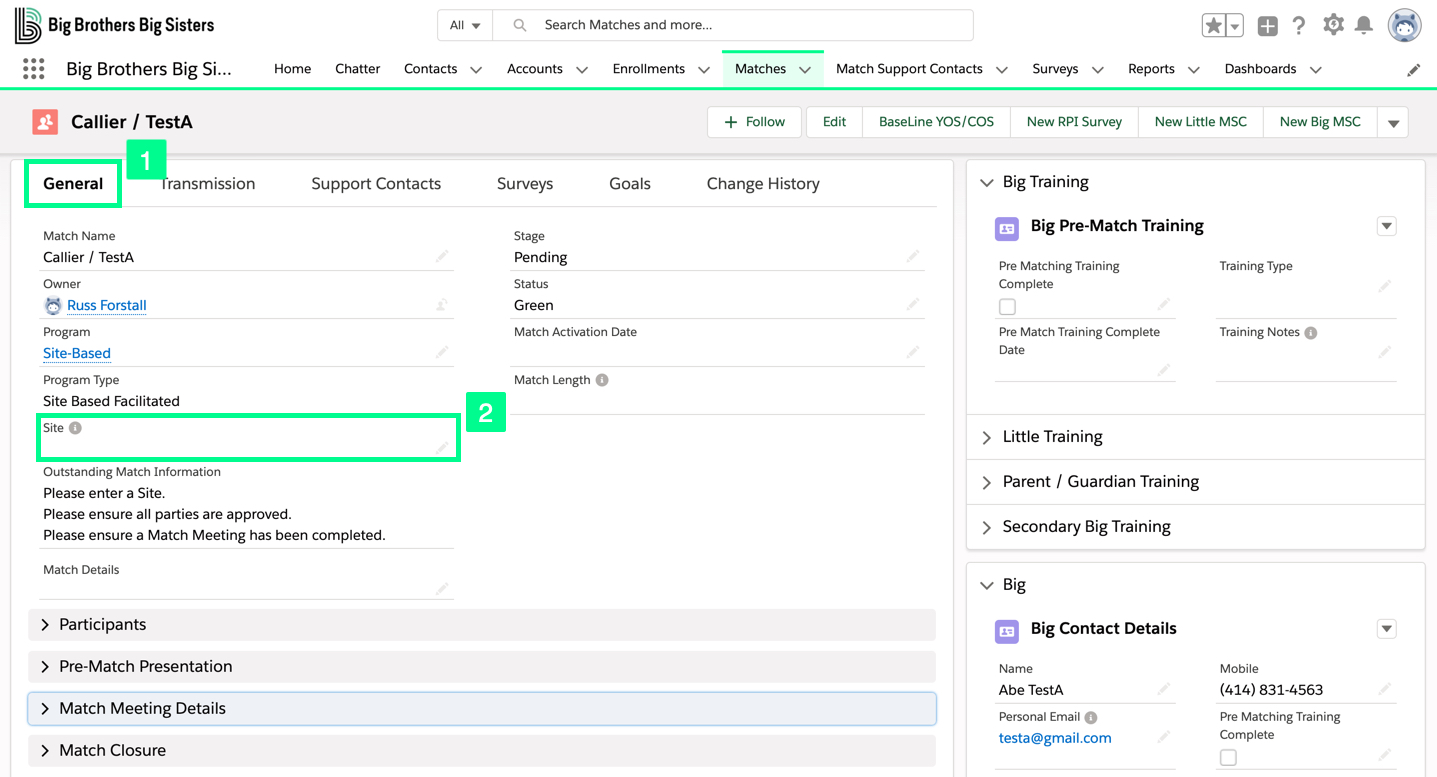
- In the Match Record, navigate to the General tab and location the Site field.
- Click the pencil and enter the name into Search Accounts….
- Choose the Site.
- Click Save.
Generating a Baseline YOS/COS
Before you can complete a Baseline YOS/COS, the survey must be generated for the appropriate match. Follow these steps to generate a Baseline YOS/COS for a Match:
- In the Match Record, click the Baseline YOS/COS button.
- Click Yes to the question below:

Completing a Baseline YOs/COS
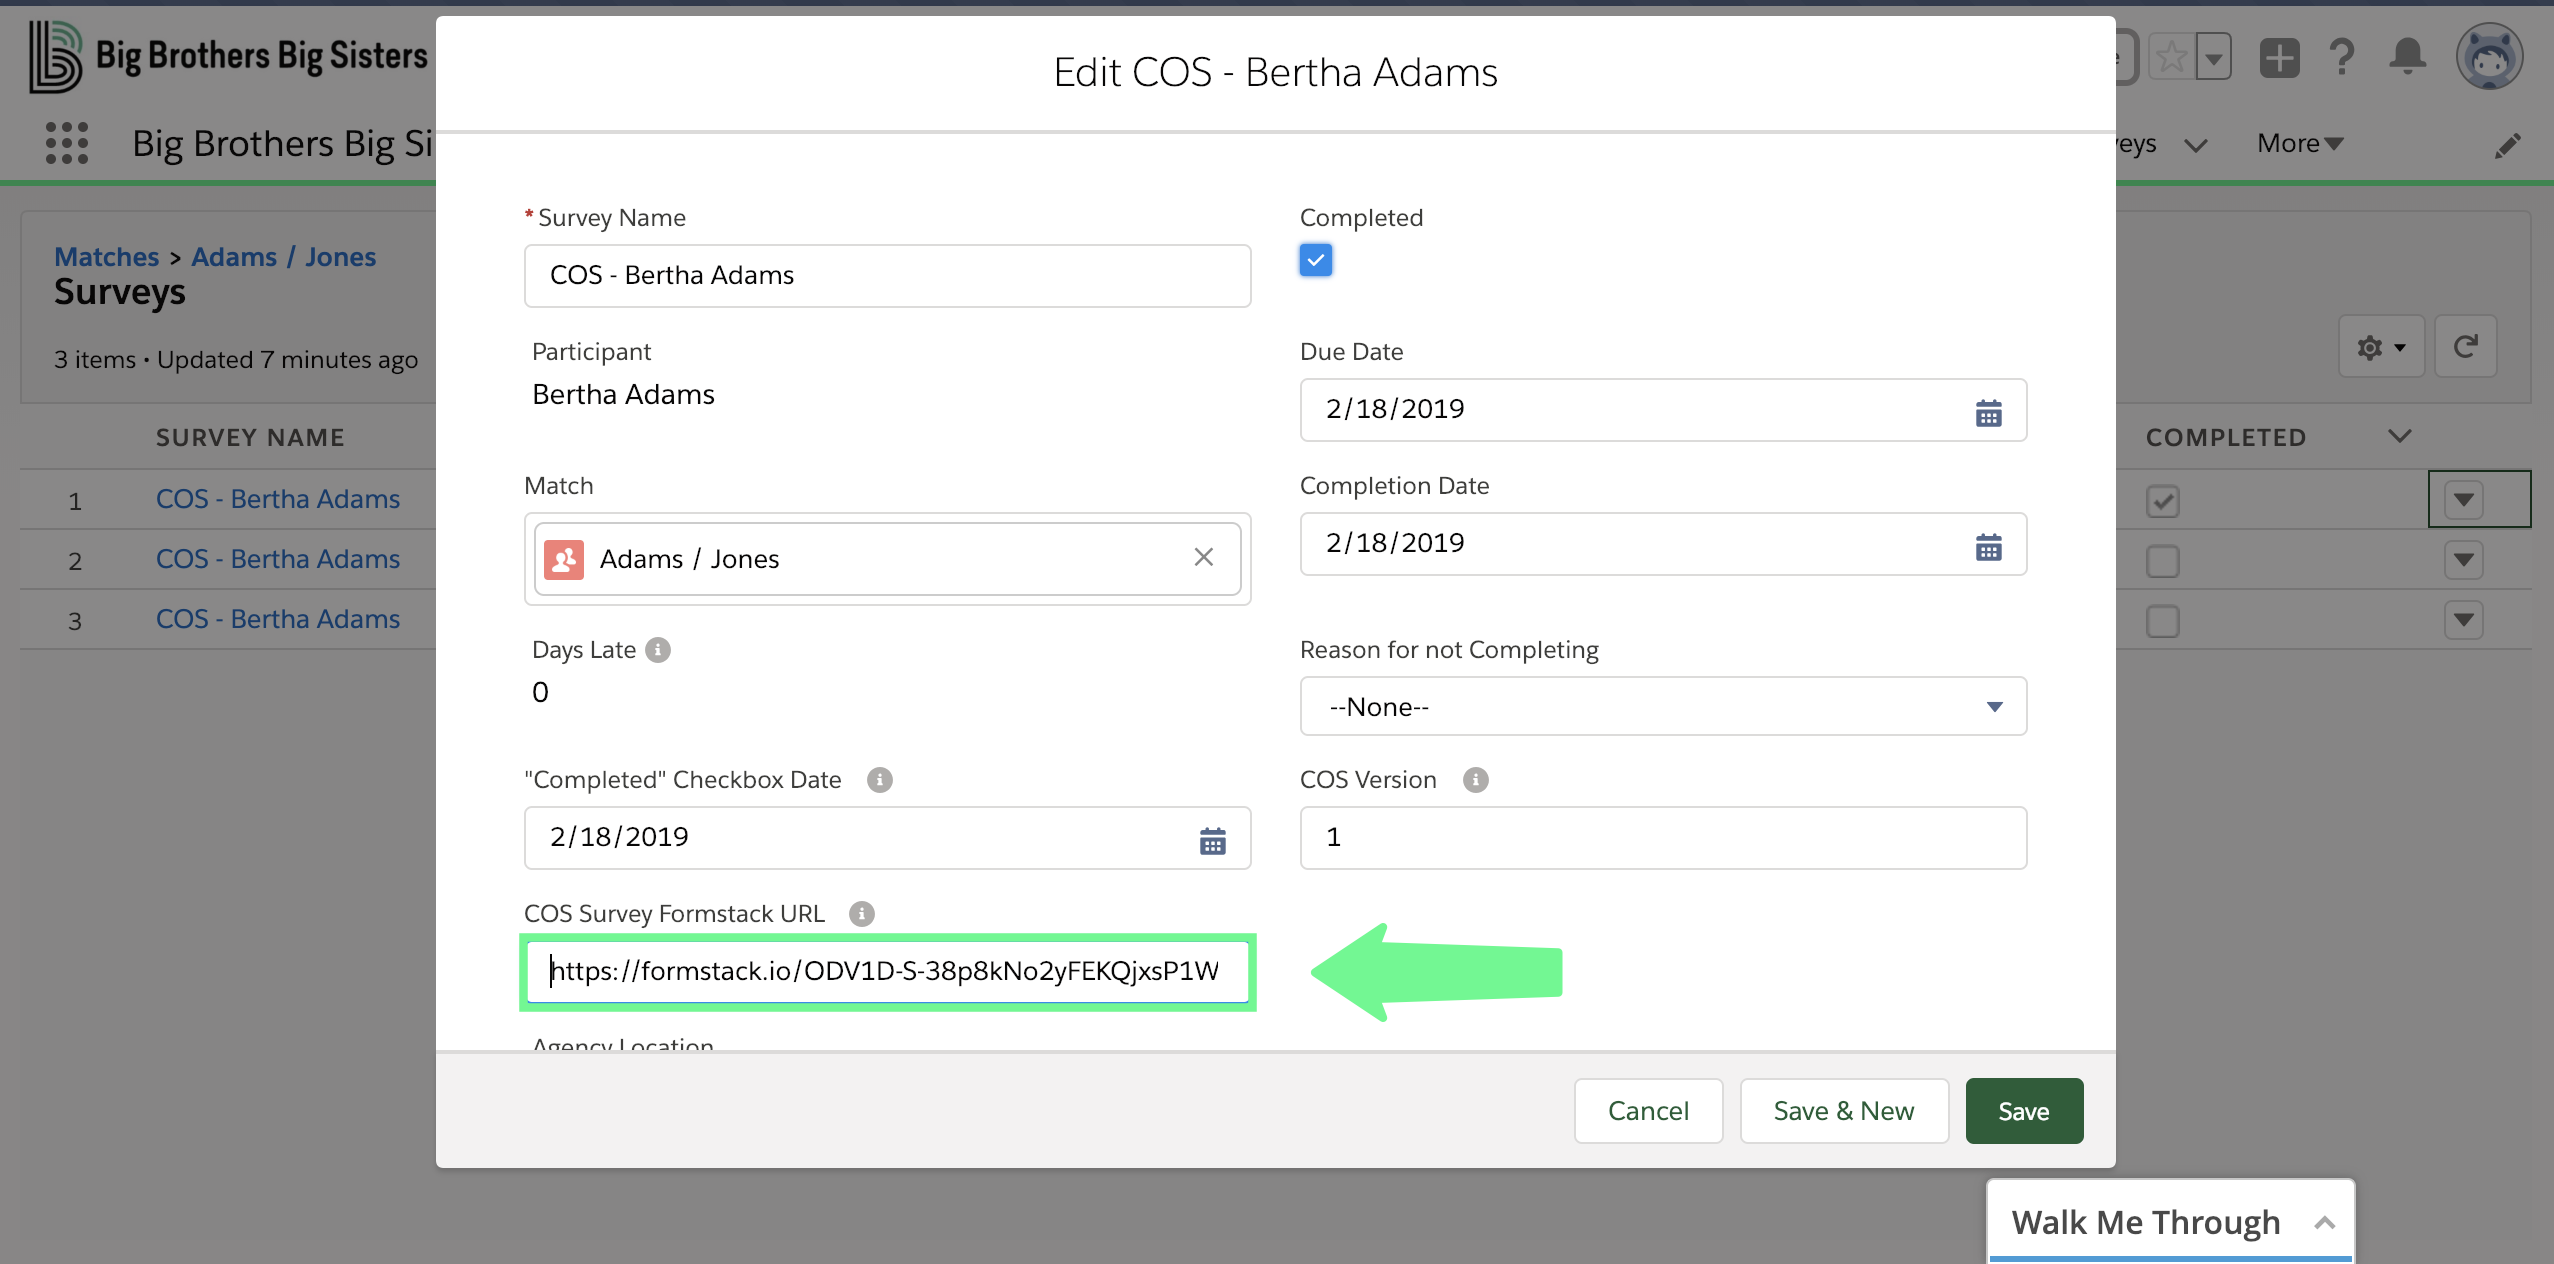
You can follow these steps to Mark a Baseline YOS/COS as complete:
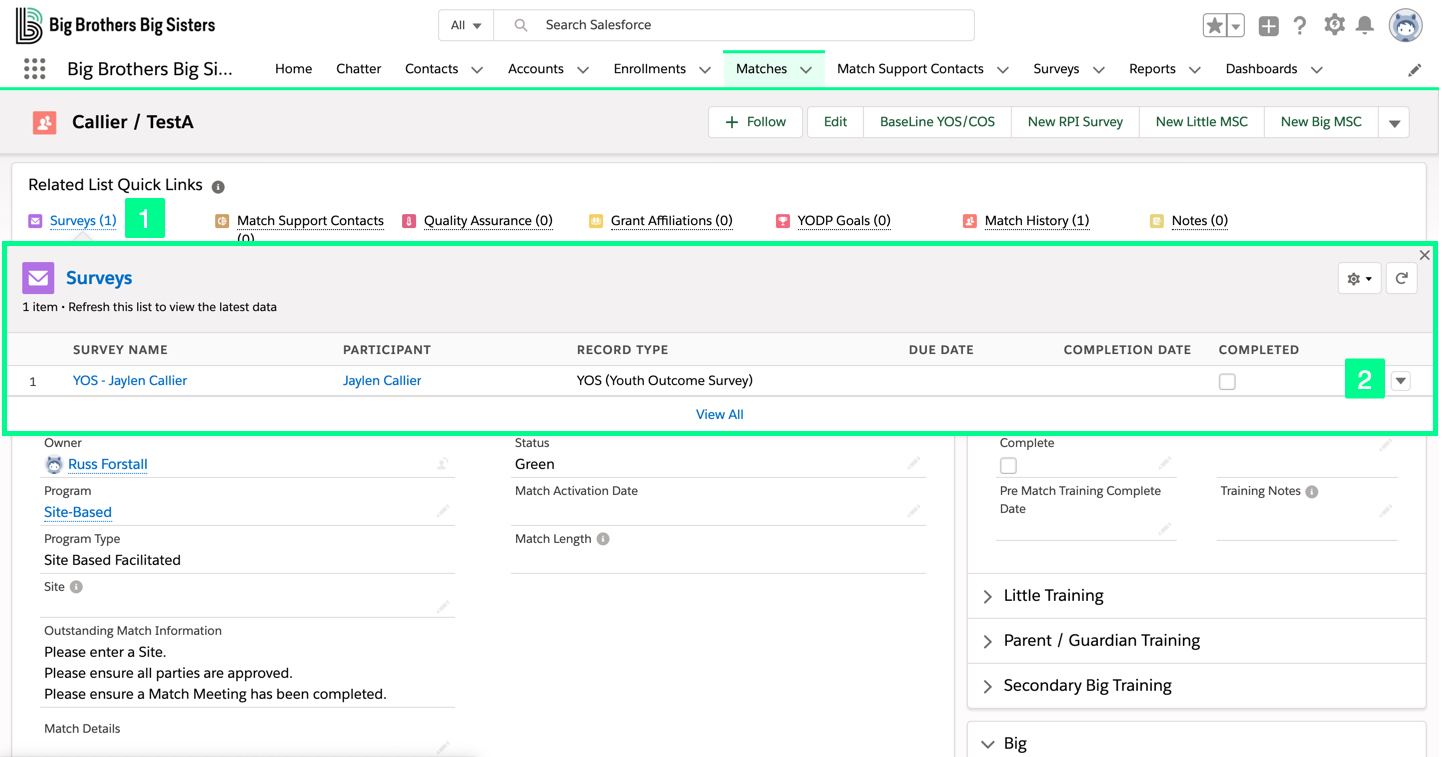
- In the Match Record, locate the Related List Quick Links and click Surveys. This brings up a list of the surveys associated with this match.
- Click
 and Edit.
 - In the COS/YOS Survey Formstack URL field, click the link (see image below). This takes you to the web version of the survey.
- Complete the survey and click Submit.
Survey Timing
Below is the exact timing for surveys being created and closed in Matchforce:
- 3-Month SOR: This survey will be automatically created in Matchforce 15 days before the 3-month anniversary of the match’s activation date. This survey will remain open in Matchforce for 45 days after the 3-month anniversary of the match’s activation date. If not completed, this survey will close on the 46th day after the 3-month anniversary of the match’s activation date. Surveys cannot be completed once closed. Matchforce calls the last day a survey is open the due date. For this survey, this differs from the historical usage of survey due date as the match’s 3-month anniversary date.
- Annual CB SOR, YOS, and COS: These surveys will be automatically created in Matchforce 15 days before the annual anniversary of the match’s activation date. These surveys will remain open in Matchforce for 45 days after the annual anniversary of the match’s activation date. If not completed, these surveys will close on the 46th day after the annual anniversary of the match’s activation date. Surveys cannot be completed once closed. Matchforce calls the last day a survey is open the due date. For these surveys, this differs from the historical usage of survey due date as the match annual anniversary date.
- SB SOR, YOS, and COS: These surveys will be automatically created in Matchforce on April 16th of each year. These surveys will remain open in Matchforce until June 30th of each year. If not completed, these surveys will close on July 1st of each year. Surveys cannot be completed once closed. Matchforce calls the last day a survey is open the due date. For these surveys, this differs from the historical usage of survey due date as June 1st.
Documenting Rationale for a Match
Follow these steps to document the rationale for a match:
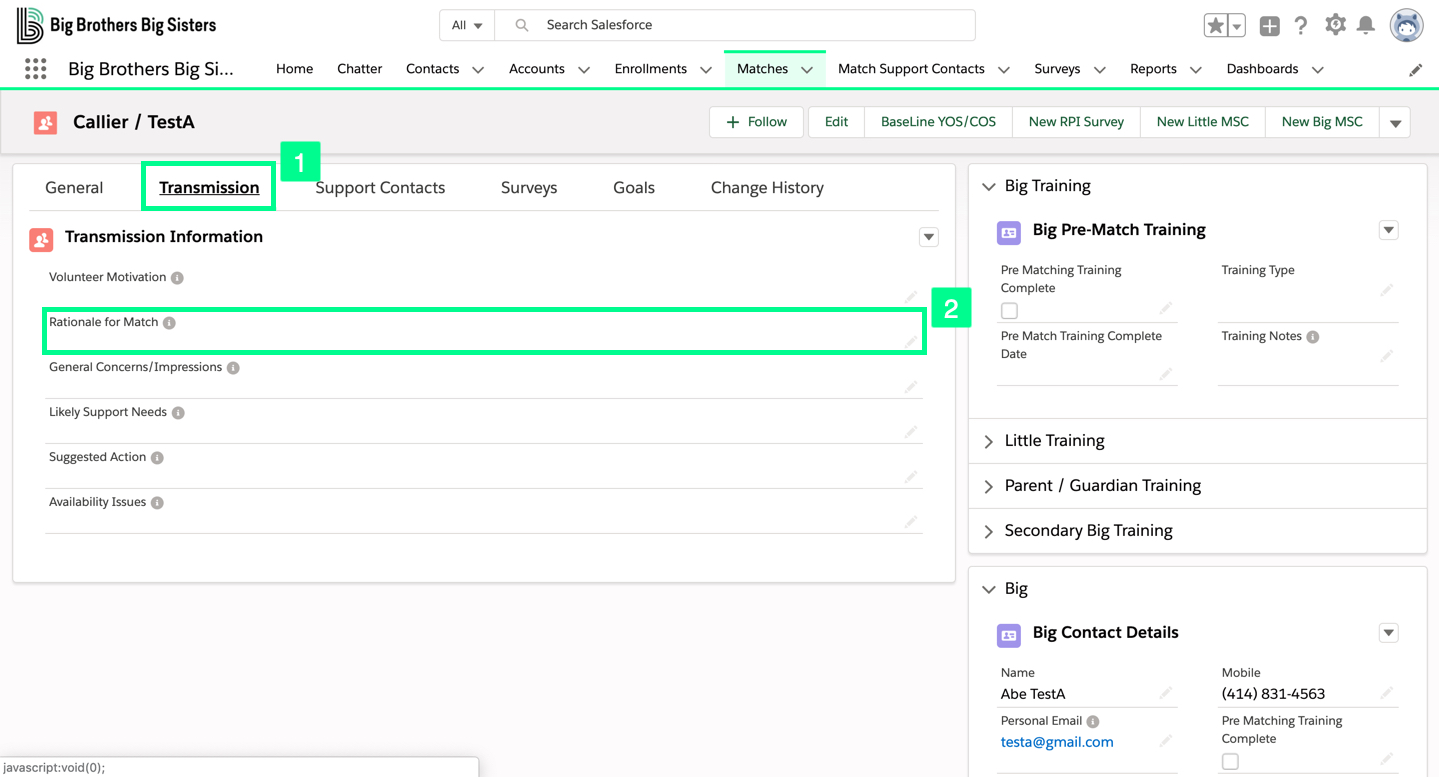
- In the Match Record, scroll down to the Transmission tab.
- Locate the Rationale for Match section and click the pencil.
- Enter your rationale and click Save.
Moving a Match to Active
Once you have finished all of the required activities, a match can be moved to Active and these steps show you how:
- In the Match Record, click Active in the Match Progress Bar.
- Click
 .
. - The Match Progress Bar is now updated to show the current stage:

Moving a Match to Not Approved
If – within the first 24 hours since a match was activated – it is determined that the match should not remain active, staff may move the match to the “Not Approved” match stage without the match counting as a closed match.
- On the Match Progress Bar, click Not Approved.
- Click .
- The Match Progress Bar is now updated to show the current stage:
- The contacts applications of the dissolved match are automatically moved back to the Ready to be Matched enrollment stage.

Moving a match to Not Approved returns the Big and Little to Enrollments.
Changing a Match from one Program Type to Another
To transfer a match from one program type to another, follow the following steps.
- Complete any match support contacts that are currently due for the match under the current program type.
- Ensure that all required enrollment steps for each participant have been completed for the program type you’re transferring the match to.
Note: If there exist any current program type planned contacts that are future dated and incomplete, mark those MSCs as cancelled. - After completing those steps, go to the General page of the match, click the pencil on the Program field, search and select the new program name belonging to the new program type and click Save.
- If necessary, add or remove the “site” name from the Site field on the match.
- Now that the program type transfer is complete, add the first round of planned contacts to the match. Once they are completed, the next MSC due dates will begin to reflect the new program types scheduling.
Closing a Pending Match
If a match is in the “pending match” stage and it is determined that the match should not be activated, follow these steps:
- Document any necessary information in the activity section of the pending match.
- On the Match Progress Bar, click Not Approved.
- Click (Mark Stage as Complete).
- The match progress bar is now updated to show the Not Approved stage and all historical content previously entered on the match will be retained.
- The contacts applications of the dissolved match are automatically moved back to the Ready to be Matched enrollment stage.
Creating a New Couples Match (Adding a Secondary Big)
When creating a pending match, the option to add a Secondary Big is available. Only volunteers who are Ready to be Matched may be added as a Secondary Big. To add a Secondary Big to the match, follow the following steps:
- After clicking either “Match with Big” or “Match with Little”, navigate to the Secondary Big Application field and select the RTBM stage application for the additional Big being added to the match.
- After completing all other steps, click Save.
- Next, navigate to the newly added Secondary Big’s application record and select the “Secondary Big Update” action button and save the stage as “Pending Match” OR if the match has already been activated, select the stage of “Matched.”
Adding a Secondary Big to an Existing Match
After a match has been activated, a Secondary Big may still be added to the match. To do so, please follow these steps.
- Open the match record and click the Add Secondary Big Action button.
- Add the Secondary Big’s RTBM application and then add the contact name to the Secondary Big form.
- Click Save.
- Next navigate to the Secondary Big’s application record just added and select the “Secondary Big Update” action button. Save the stage as “Pending Match” and then save the stage as “Matched” (Matchforce will only allow you to advance one stage at a time).